

Nursery Transformation
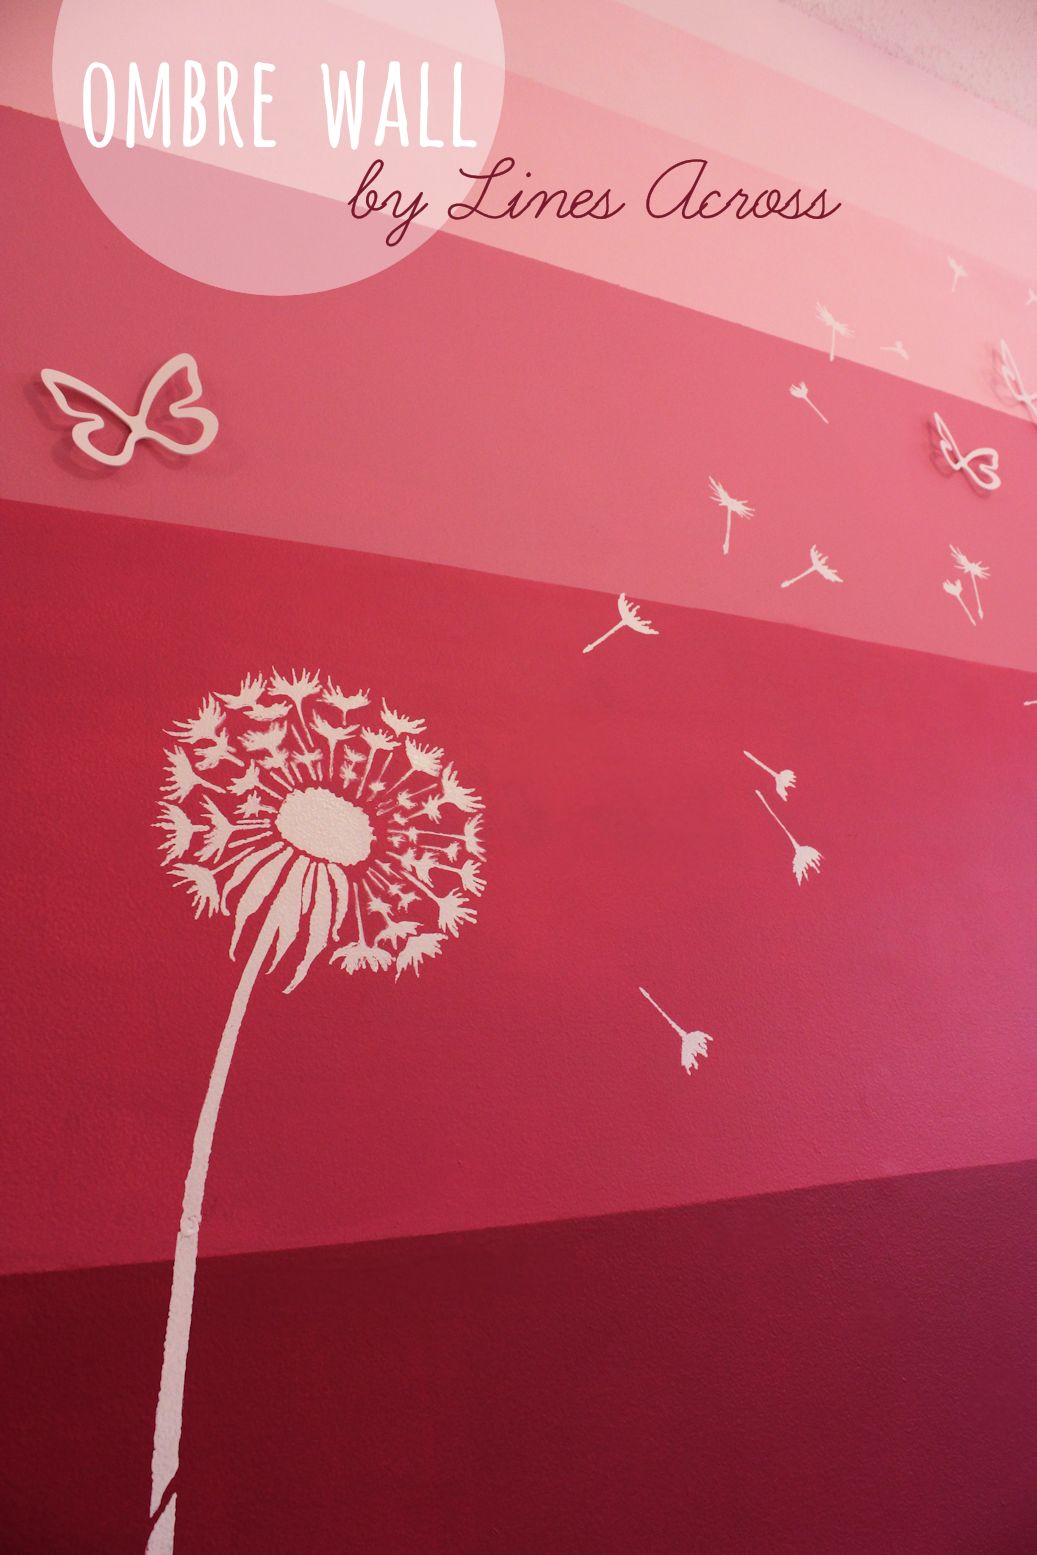
Rachel from the blog Lines Across recently took on a stenciled ombre accent wall project that completely transformed her daughter’s nursery! Rachel is right on trend, as ombre and stencils are both hot right now! This project began when Rachel’s daughter was a newborn and Rachel painted her room a light pink hue in hopes that it would be soft and subtle; perfect for a baby girl, right? Not always…once the room was finished, Rachel said it “felt a little bit like someone was trying to smother you with cotton candy!”
The Stencil Touch
From there, Rachel decided that her daughter’s room needed an interior with more of a punch, and chose to take on an ombre accent wall project complete with a stenciled design! Her daughter’s room is garden-themed, so Rachel’s decision to use Cutting Edge Stencils’ dandelion stencil as an accent wall was a great choice! Completing the ombre wall was a bit time consuming, as you will see below, but the dandelion stencil was super simple and easy to use! Rachel chose to stencil just one dandelion on her daughter’s ombre accent wall, but being that Cutting Edge Stencils products are reusable, multiple dandelions are always a possibility! Rachel also checked out the tutorial videos on the Cutting Edge Stencils website before she began her project, which she found helpful, and used a roller to apply paint over her stencil; however, in retrospect, she “thinks that it would have been better to use a stenciling brush.”
Onto the ombre!
Creating an ombre accent wall is actually more complicated than you may think. Rachel highly advises carefully planning out your project before you start, as there are many different colors and measurements that you will need to keep in check. Make lists, label things…whatever you need to do! Proper planning will produce absolutely stunning results, as we saw from Rachel! Rachel opted to design her ombre accent wall so that the stripes gradually got larger as they went down, but making all of the stripes the same size is always an option! In terms of color, Rachel based her color scheme off of the light pink hue that her daughter’s room was initially painted, and chose her other colors around that. Since Rachel was only doing one stripe in each color, she was able to use one paint sample per stripe! Be sure to keep track of which paints are which so you achieve your desired ombre look!Rachel did a wonderful job documenting the entire ombre process on her blog using easy-to-follow graphics and photographs! Be sure to check it out! Additionally, the final stenciled ombre accent wall looks absolutely stunning! Kudos, Rachel!

Love stenciled ombre accent walls? Here’s what you can do:
- Visit Lines Across to see full tutorials
- Shop Cutting Edge Stencils to buy a stencil for your next DIY project
- Pin these photos to show your love
- Visit us on Facebook to show your very own ombre stencil project
http://blog.cuttingedgestencils.com/lines-across-ombre-stencil-nursery-transformation.html
How to Paint an Ombre Accent Wall

(find the dandelion stencil here)
As many of you know, we just moved back into the townhouse where Grant and I first lived after we got married, and where we were living when Benjamin and Lyla were born. When Lyla was only 2 months old, we loaded up a little truck with a little bit of our stuff and moved across town to live with and help take care of my Grandmother. We thought we would only be there for a couple of months, but as these things go a couple of months turned into over a year.
I'm really not a big pink person, but there is something sweet about a newborn little girl and light pink. So we painted Lyla's nursery a really light shade of pink (Behr's Poetic Princess). I chose this color because I wanted it to be subtle and not overwhelmingly pink. The strange thing is, when the whole room was that pale pink color, it felt a little bit like someone was trying to smother you with cotton candy. So I decided that what the room needed was a more dramatic accent wall.

The theme of the room is a garden... flowers, bugs, butterflies, birds, etc... Plus, I LOVE dandelions! We used dandelions in our wedding invitations, plus I stitched this embroidery hoop for Lyla a long time ago. I had seen this dandelion stencil from Cutting Edge Stencils months ago, and I knew I wanted to use it when I made over Lyla's room. I also already had the 3D butterflies that look great in person (like either of these from Amazon: Umbra Mariposa Butterfly Wall Art

Let me tell you a little more about the stencil before moving onto the tutorial. Cutting Edge Stencils are really awesome and easy to use. There are so many wonderful choices for stencils that it's hard to choose which one to do. Some of the complex allover stencils (which I love) are a little bit harder to do and definitely take more time. The dandelion stencil is one of the simplest and easiest stencils. It hardly took any time at all, especially since I only ended out doing one dandelion. Make sure that you read the directions and watch some of the helpful tutorial videos from Cutting Edge Stencils before you start your stenciling project. I used a roller to paint the dandelion, but in retrospect, because of all of the little details, I think that it would have been better to use a stenciling brush.
HOW TO PAINT AN OMBRE ACCENT WALL
This is actually a complicated project. There are a lot of different
colors and measurements to keep track of, so it is very important to
plan the project well before you start, write everything down, and label
everything. Since I'm really a math person at heart, I enjoyed planning
this a lot. The project itself worked out perfectly and turned out
better than I had expected.
First, measure the height of your wall and decide how many stripes you
want (plus what colors they will be). I wanted to make it so that the
stripes got increasingly larger (this is where the math came in), but
you could also make all of the stripes the same size. For the colors, I
ended out getting the paint chip that her original wall color was on,
and getting sample sizes of the other colors. I only had to use one
paint sample per stripe, but you might need more paint for a larger
wall. Make sure that you label these!

Here is the pattern I followed. If your wall is between 92 and 100
inches, you can use the same pattern. The stripe at the very bottom can
be a little bigger than the rest.

STEP 1 - Measure where each of the lines will be and mark them
with small pieces of painter's tape. (I drew arrows on the tape to help
me remember which side was marking the edge of the stripe.


STEP 3 - Let the paint dry and then carefully tape off the outside of the even stripes. Use a level and make sure that your lines are straight.

STEP 4 - Now paint the even numbered stripes. This time, make sure to stay inside of the lines. Paint 2 (or more) coats.

http://www.linesacross.com/2012/07/how-to-paint-ombre-accent-wall.html


Nessun commento:
Posta un commento