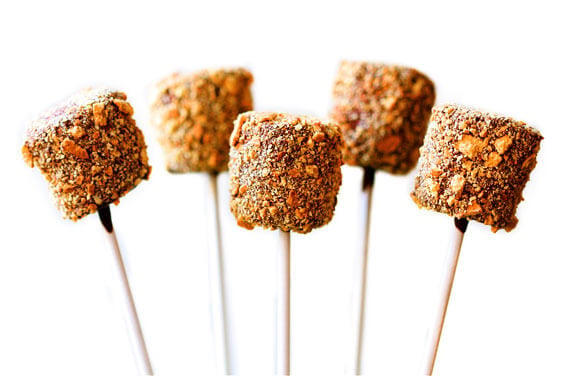
These cake pops are so cute you can give them away as party favours.
Cake pops are based on the same idea as
cake balls,
with the addition of a lollipop stick and a different approach to
dipping. The lollipop sticks increase the cuteness factor, making them
perfect for party favours and gifts.
Ingredients
- 18.25-ounce box cake mix
- One 9-by-13-inch cake pan
- Large mixing bowl
- 16-ounce container ready-made frosting
- Large metal spoon
- Wax paper
- Two baking sheets
- 48 ounces (3 pounds) candy coating
- Plastic wrap
- Deep, microwave-safe plastic bowl
- 48 paper lollipop sticks
- Styrofoam block
Directions1 Bake the cake as directed on the box, using a 9 x 13" cake pan. Let cool completely.
2
Once the cake is cooled, get organized and set aside plenty of time (a
couple of hours) to crumble, roll, and dip 4 dozen cake pops.
3 Crumble the cooled cake into a large mixing bowl. You should not see any large pieces of cake.
4 Add three-quarters of the container of
frosting.
(You will not need the remaining frosting.) Mix it into the crumbled
cake, using the back of a large metal spoon, until thoroughly combined.
If you use the entire container, the
cake balls
will be too moist. The mixture should be moist enough to roll into 1
1/2-inch balls and still hold a round shape. After rolling the
cake balls by hand, place them on a wax papercovered baking sheet.
5
Cover with plastic wrap and chill for several hours in the
refrigerator, or place in the freezer for about 15 minutes. You want the
balls to be firm but not frozen.
6 Place the candy coating in a deep, microwave-safe plastic bowl. These bowls make it easier to cover the
cake balls completely with candy coating while holding the bowl without burning your fingers.
7
Melt the candy coating, following the instructions on the package.
Microwave on medium power for 30 seconds at a time, stirring with a
spoon in between. You can also use a double boiler. Either way, make
sure you do not overheat the coating.
8 Now you're ready to dip. Take a few
cake balls
at a time out of the refrigerator or freezer to work with. If they're
in the freezer, transfer the rest of the balls to the refrigerator at
this point, so they stay firm but do not freeze.
9 One at a time, dip about 1/2 inch of the tip of a
lollipop stick into the melted candy coating, and then insert the lollipop stick straight into a
cake ball, pushing it no more than halfway through.
10 Holding the lollipop stick with
cake ball attached, dip the entire
cake ball
into the melted candy coating until it is completely covered, and
remove it in one motion. Make sure the coating meets at the base of the
lollipop stick. This helps secure the
cake ball to the stick when the coating sets. The object is to completely cover the
cake ball
and remove it without submerging it in the coating more than once. A
small, deep plastic bowl is very helpful during this step. If you do
resubmerge the cake pop, the weight of the candy coating can pull on the
cake ball and cause it to get stuck in the coating.
11
The thinner the consistency of your coating, the easier it will be to
coat the cake pops. If you find that your coating is too thick, add some
shortening or paramount crystals to help thin it and make the coating
more fluid.
12 When you remove the cake pop from
the candy coating, some excess coating may start to drip. Hold the cake
pop in one hand and use the other hand to gently tap the first wrist.
Rotate the lollipop stick if necessary to allow the excess coating to
fall off evenly, so one side doesn't get heavier than the other. If you
didn't completely dunk the cake pop, this method of tapping and rotating
generally takes care of that. The coating will slowly slide down the
surface of the
cake ball until it reaches the lollipop stick.
13
If too much coating surrounds the base of the lollipop stick, you can
wipe the excess off with your finger. Simply place your finger on the
stick right under the
cake ball
and spin the lollipop stick, allowing any excess coating to fall off
and back into the bowl of coating. When most of the excess coating has
fallen off and it is no longer dripping, stick the cake pop into the
prepared Styrofoam block. Repeat with the remaining
cake balls and let dry completely.
14
Store the cake pops in an airtight container on the counter or in the
refrigerator for several days. You can also cover them in small treat
bags, tied with a ribbon, and leave them in the Styrofoam block on the
counter.
Tips
- Make the cake the day before and let it cool overnight.
- Use a toothpick to encourage the coating to cover any small exposed areas or to make sure it surrounds the lollipop stick.
- Make sure the cake balls
are chilled and firm when you dip them. If they are room temperature,
they are likely to fall off the lollipop sticks into the melted candy
coating. You can always place them back in the freezer for a few minutes
to quickly firm them up again.
- Poke holes in the Styrofoam
block before you start dipping the pops. Just use one of the lollipop
sticks to make holes about 2 inches apart.
- For fun, experiment with different colors of candy coating.
- Cake pops need more attention and therefore a little more time to complete than the cake balls. Set aside a couple of hours.
- When
using the cake pop method, you can also make the balls in different
shapes. Just roll them into balls, place in the freezer or refrigerator
to firm, and then mold into your desired shape.
For truffle-like cake pops, check out our basic cake balls recipe.
 BUY THIS BOOK
Excerpted from Cake Pops
by Angie Dudley. Published by Chronicle Books. Copyright 2010 by
Chronicle Books. All rights reserved. Reprinted by permission of
Chronicle Books.
http://www.styleathome.com/food-and-entertaining/recipes/recipe-cake-pops/a/32575