AMICI

Votamiiiiiiiiiiiiiiiiiiii

Visualizzazione post con etichetta Cupcakes. Mostra tutti i post

12 febbraio 2013

Stork Easy To Mix Baking Liquid review

British baking brand Stork has launched its first product in almost a century, namely Stork Easy to Mix Baking Liquid. They explain : "The new easy-to-use format makes baking with children a piece of cake and so is great for a summer of baking and celebrations! It's also suitable for vegetarians and vegans." Well, that sounded right up our street so I entusiastically said yes when they offered to send us some to try out.
As you can see in the picture above, it comes out as a thick yellow liquid. I poured some into the cake tin so that you could see what it looks like before I added the other ingredients, but it is a replacement for butter, not a ready to use cake mix, so you need to use sugar, flour, eggs etc with it.
The baking liquid is really easy to measure out because it comes in a bottle with a gauge on the side, which is really handy. The instructions say you should use 110ml of baking liquid for every 100g of butter or margarine. Stork did send me through some recipes to try out, but I needed to knock up a quick sponge cake to use as a base for my Union Jack icing (more about that in a moment) so I just adapted my usual recipe, throwing in some vanilla essence and lemon juice to liven it up because a quick taste of the raw batter tasted quite bland. I also added some dolphin and flower sprinkles to the mix to make it all more appealing to the kids !
I have to say, it was much easier to mix than when you have the arm-breaking job of creaming together butter and sugar. For busy mums, that's just a time-saving bonus but for anyone with a disability or anyone elderly who may not have much strength in their arms, it does take all the work out cake making.
I left the cakes to cook for the usual amount of time and they turned a lovely golden colour. However, they looked a bit strange and sunken in the middle.
They looked almost swampy in the centre so I thought they weren't cooked through but a knife blade inserted in the middle came out clean so I decided to bite the bullet and say they were done.
When I pushed out the round cake (from its silicon cake tin), I flipped it over to see what it looked like underneath and decided it certainly didn't look cooked enough.
As this close-up shows, the cake looks very buttery and greasy, so I decided to put it back in the oven upside down for a further ten minutes to see if this would sort it out.
I moved on to the square cake in a regular metal cake tin and it was stuck solid. Although the outer edges were lovely and crispy, the inside was a strange texture like butter-drenched breadcrumbs. As you can see, it stuck like glue to the spatula when I tried to dislodge it from the tin and came out in greasy lumps. Hmmm.
I left it to cool down completely, wondering if it would go more solid as it cooled but - as you can see - all I managed to do was dislodge the crispy edges of the cake in pieces. I think this is about the first absolute disaster I've had in the kitchen for a while so it was actually quite funny !
After a further ten minutes in the oven, I decided the other cake was as good as it was going to get. It has a very sticky, dense, buttery texture like honey cake, not the soft, light sponge cake I was hoping for, but the kids and Madhouse Daddy Mike polished off nearly the whole cake between them last night and today so it obviously got their seal of approval ! I refused to use this cake as the basis for the icing kit though because it would have been too much - it's already rich enough on its own and certainly doesn't need any extra sugar and sweetness from the sugar icing.
So - not sure really !! For ease of use, it's great. It produced a cake that was declared delicious by everyone but that absolutely didn't resemble the result I usually get with normal butter and the same recipe. The failed square cake leads me to believe that this would make absolutely wonderful gooey, buttery cookies. I think it would be good for smaller cakes like cupcakes and muffins too, that would cook through to the core properly and avoid the swampy centre that I got with the big cakes.
I still have half a bottle left so I'll experiment further and report back ! In the meantime, I'll share some of the recipes that Stork sent through. I think I'll try one of these next time to see how they come out. Fingers crossed ! (Although it appears that even the culinary disasters taste nice so it's not all bad !)

http://madhousefamilyreviews.blogspot.com/2012/05/stork-easy-to-mix-baking-liquid-review.html

Stork Easy to Mix Baking Liquid recipe ideas

I've just reviewed Stork Easy To Mix Baking Liquid (here) and, as promised, am back to share with you the recipes that Stork sent through for me to try out. Enjoy and let me know how you get on ! I'll be trying at least one of these out myself so watch this space to see how they come out !
******************************************************
Cherry and Almond Muffins

Servings:
makes 12 Preparation time: 10-15 minutesCooking time: 20-25 minutes
Ingredients:175g (6 oz) Stork Baking Liquid
175g (6 oz) golden caster sugar

300g (11 oz) self raising flour, sieved
3 medium eggs
5 tablespoons milk
1 teaspoon almond essence
½ teaspoon baking powder
250g (9 oz) fresh cherries, stoned and quartered
Method:1. Place 12 muffin cases into a muffin tray
2. Add all the ingredients except the cherries into a bowl, and beat with a wooden spoon until the mixture is smooth
3. Reserve some cherries for decoration and fold the remainder into the mixture
4. Divide mixture evenly between the paper cases, and decorate the tops with remaining cherries
5. Bake in a pre-heated oven for 20-25 minutes oven 200°C, 180°C (fan assisted), gas mark 6. Dust with icing sugar to serve
**************************************************

Mini Golden Victoria Sponges

Number of Servings: 12-14

Preparation Time: 12 Mins

Cooking Time: 25-35 Mins


225g (8 oz) Stork Baking
225g (8 oz) castor sugar
4 eggs, medium
225g (8 oz) self-raising flour, sieved
1 teaspoon baking powder
Filling:
2 tablespoons jam
150ml Elmlea Whipping, whipped
Caster or Icing sugar, to dredge

  1. Place all cake ingredients in a mixing bowl and beat together until smooth. Divide in half and add coffee essence and walnuts to one half and mix well.
  2. Place heaped tablespoons of the mixes in 12 muffins cases. Bake in centre of pre-heated oven at 180° C, (fan oven 160-170° C), Gas mark 4 for 20-25 minutes. Turn out, remove paper and cool on wire tray. When cold remove the cakes from the cases and cut in half horizontally.
  3. For the Victoria cakes, fill with the jam and whipped Elmlea and a dusting of icing sugar.

Each serving contains:
Calories
Sugars
Fat
Saturates
Salt
351kcal
26.1g
19.9g
5.4g
0.5g
18%
29%
28%
27%
8%
of an adult's guideline daily amount
 

Stork Easy To Mix Baking Liquid - round 2 !

You may remember, a few weeks ago, we tried out Stork Easy To Mix Baking Liquid, adapting a recipe for a sponge cake that would usually use butter. Although it made mixing an absolute breeze, I wasn't entirely satisfied with the result because it sunk in the middle and came out very greasy (and let's not even mention the one that totally stuck solid to the tin !). I was convinced it was a problem with the proportions though and was keen to give it another try.
This time, to give it the fairest trial possible, I used one of the recipes that have been created specifically for use with the Stork Baking Liquid. I shared with you here on my blog a recipe for Mini Golden Victoria Sponges so I decided to give that a go. Here's what they are supposed to look like.


Number of Servings: 12-14
Preparation Time: 12 Mins
Cooking Time: 25-35 Mins
225g (8 oz) Stork Baking Liquid
225g (8 oz) castor sugar
4 eggs, medium
225g (8 oz) self-raising flour, sieved
1 teaspoon baking powder
Filling:
2 tablespoons jam
150ml Elmlea Whipping, whipped
Caster or Icing sugar, to dredge
  1. Place all cake ingredients in a mixing bowl and beat together until smooth.
  2. Place heaped tablespoons of the mixes in 12 muffins cases. Bake in centre of pre-heated oven at 180°C, (fan oven 160-170° C), Gas mark 4 for 20-25 minutes. Turn out, remove paper and cool on wire tray. When cold remove the cakes from the cases and cut in half horizontally.
  3. For the Victoria cakes, fill with the jam and whipped Elmlea and a dusting of icing sugar.
OK, fingers crossed !
 

Well, knocking up the mixture was an absolute breeze, taking just seconds, but it all looked perfect at this stage last time too !

Ten minutes later, they were looking pretty good. These slightly flat ones are the ones that I made in the bun tins.

But the ones made in silicon muffin cases look fantastically fluffy. Now that's more what I was expecting last time !
I broke one in half to check and, as you can see, it's the perfect light sponge inside - yay !
They were delicious with a smear of Hawkshead Salted Caramel Sauce spread on top. Dora looks like she's trying to eat it too !
But the Madhouse Mini-testers wanted to copy the recipe suggestion, adding whipped cream and strawberry jam. (I admit it, our whipped cream was squirty cream straight from the can !) They even topped them off with multi-coloured sprinkles for a truly decadent dessert that made them go wow !

So there you have it. Stork Easy To Mix Baking Liquid DOES make light sponges ! I'm still not quite sure why the first attempt went so horribly wrong - a problem with the proportions ? Maybe it doesn't work so well when you adapt a normal recipe or make a big cake ? Maybe I did something wrong without realising it? Maybe it was sod's law because I needed a light sponge base for my Jubilee cake ?!

I gave it 3/5 last time because I loved the concept, even if the cake went wrong, so this time, I'll give it an extra point because the cakes had the perfect light texture. If you're baking with the kids or don't have the energy or strength to cream together butter and sugar, it's a great time and effort-saver.


for more information : www.bakewithstork.co.uk

http://madhousefamilyreviews.blogspot.com/2012/07/stork-easy-to-mix-baking-liquid-round-2.html

Halloween Pumpkin Cupcakes

Halloween Pumpkin Cupcakes

  • medium
  • < 15 min.
  • 12 portions
  • Stork Liquid

Ingredients

    For this recipe you can use Stork Baking Liquid, Stork Tub or Stork Packet.

    • 175g (6 oz) Stork Baking Liquid
    • 175g (6 oz) golden caster sugar
    • 300g (11 oz) self raising flour, sieved
    • 3 medium eggs
    • 5 tablespoons milk
    • ½ teaspoon baking powder
    • 100g cooked pumpkin or butternut squash, mashed
    • 50g chocolate and hazelnut spread
    • Zest of 1 orange
    • 115g icing sugar
    • A little orange juice
    • 55g (2 oz) plain chocolate, melted or use chocolate and hazelnut spread
    • Liquorice sweets and laces to decorate

Method

  • 1
  • 2
  • 3
  • 4
  • 5
  • 6
Oven Temperature: 200 C
Baking time: 20 m

GDA

Each serving contains:   GDA*
Calories  381kcal 19%
Sugars 26.3g 29%
Fat 15.9g 23%
Saturates 3.2g 16%
Salt 0.5g 8%
*of an adult's guideline daily amount

Handy Tip

Halloween Pumpkin Cupcakes

Top the cakes with candy spiders. If you use frozen pumpkin you don’t need to defrost it first: but it may take a little longer to cook.


1.Preheat the oven to 200°C, 180°C fan oven, Gas mark 6.  Then place the first six ingredients into a bowl, and beat with a wooden spoon until the mixture is smooth.


2.Stir in pumpkin mash and orange zest.


3.Divide half the mixture evenly between the 12 paper cases.


4.Add a half teaspoon chocolate spread and then top with remaining mix.  Bake in a pre-heated oven for 20-25 minutes. 


5.Add a little orange juice to the icing sugar until thick and spread over the muffins. 


6.Pipe the melted chocolate in 4 circles over the top and then drag a skewer through to give the cobweb effect. Place the sweets and laces on top to look like a spider.

http://bakewithstork.com/Recipes/Categories/Cupcakes/Halloween-Pumpkin-Cupcakes

2 febbraio 2013

CUPCAKES DE PASCUAS


Que dejan comentarios en este Blog y en Mamá x 6 y me animan a seguir!


Comenzaremos  a festejar por adelantado con la nueva imágen del blog
y un simpatiquísimo cupcake de Pascuas!

Habrá sorteos y muchos festejos más si se me acompañan!

Hoy les dejo este simple tutorial para modelar un conejito de Pascuas, con  muchos trucos para lograr un buen resultado!


PASO A PASO

Materiales:
  •  cupcake
  • fondant para cubrirlo
  • pasta de modelar para el conejo (información aquí)
  • tintes comestibles
  • estecas

De un trozo de pasta cortaremos dos piezas iguales para luego hacer dos esferas del mismo tamaño.
Comenzaremos a alargar esas esferas para formar las piernas.
Marcaremos los dedos con una esteca y luego le daremos buena forma al pie valiéndonos de un bolillo. 


Partiendo de un cono de pasta comenzaremos a darle forma al cuerpo. Con un bolillo ahuecaremos donde van las piernas y lo colocaremos sobre el cupcake.


Esta es una de las tantas formas que existen para lograr buenos rayados.
Estiramos pasta de dos colores.
Cortamos tiras parejas.
Combinamos esas tiras.
Estiramos con el rodillo.
Cortamos y vestimos al muñeco.


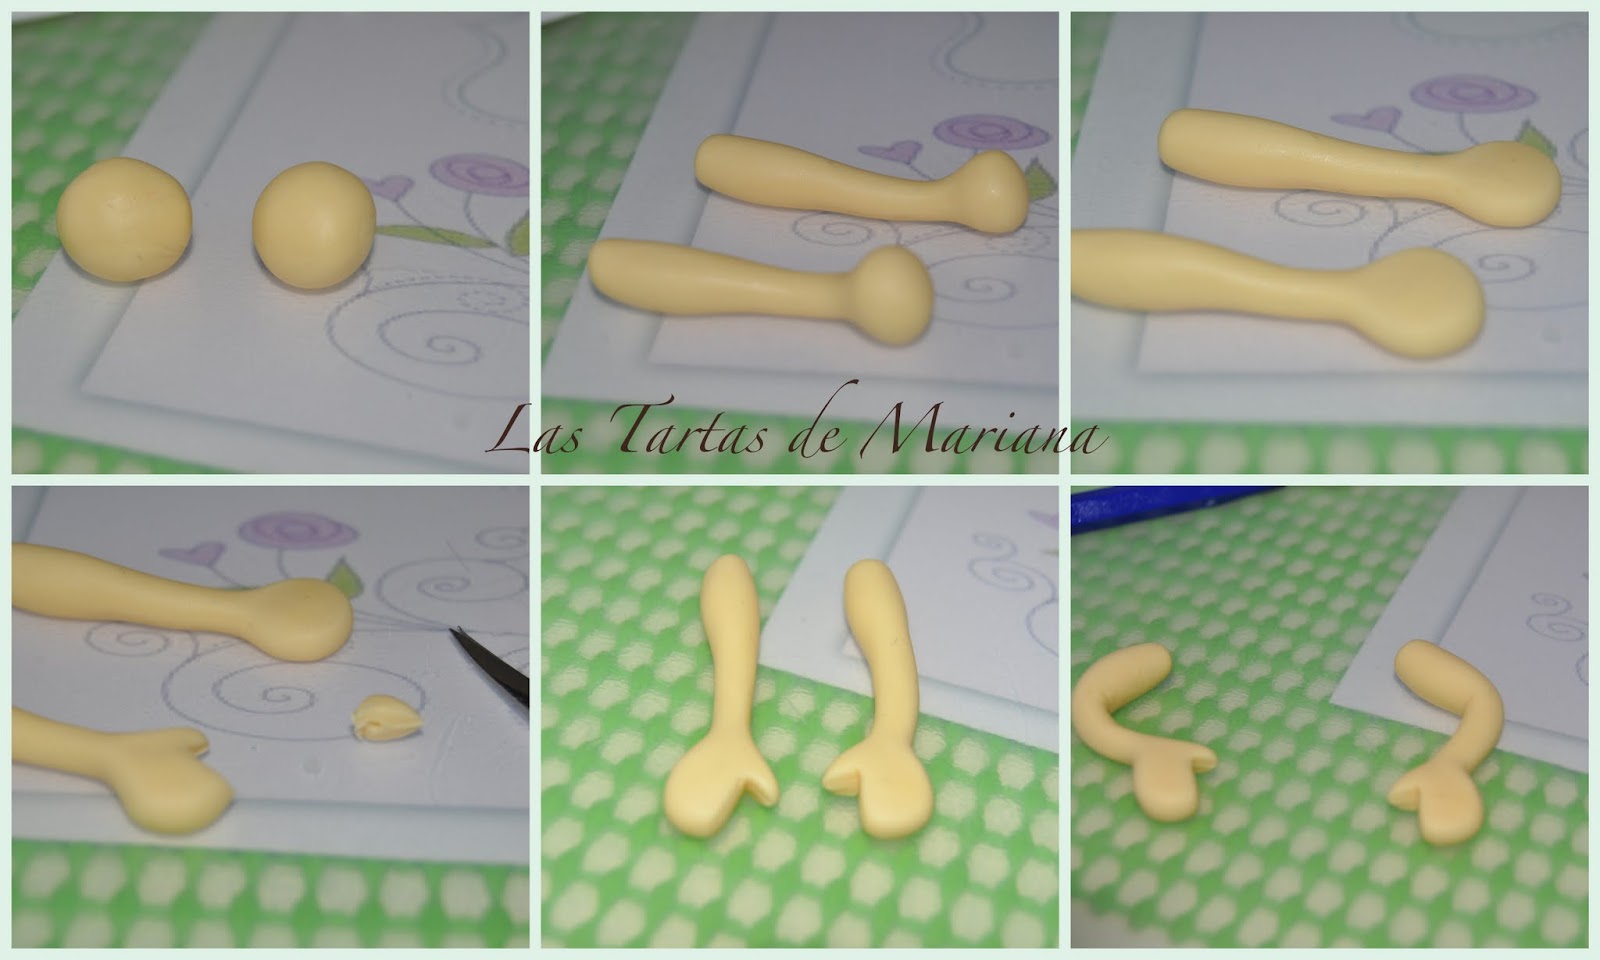
Para los bracitos partimos de dos esferas de pasta del mismo tamaño.
Las estiramos para comenzar a darles forma
Aplanamos las manitos.
Separamos el dedo pulgar del resto de la mano.
Redondeamos y doblamos para darle buena forma.


Partiendo de una tira de pasta roja cortaremos cuatro rectángulos del mismo tamaño y, siguiendo este simple tutorial en fotos,  comenzaremos a darle forma a este lazo.


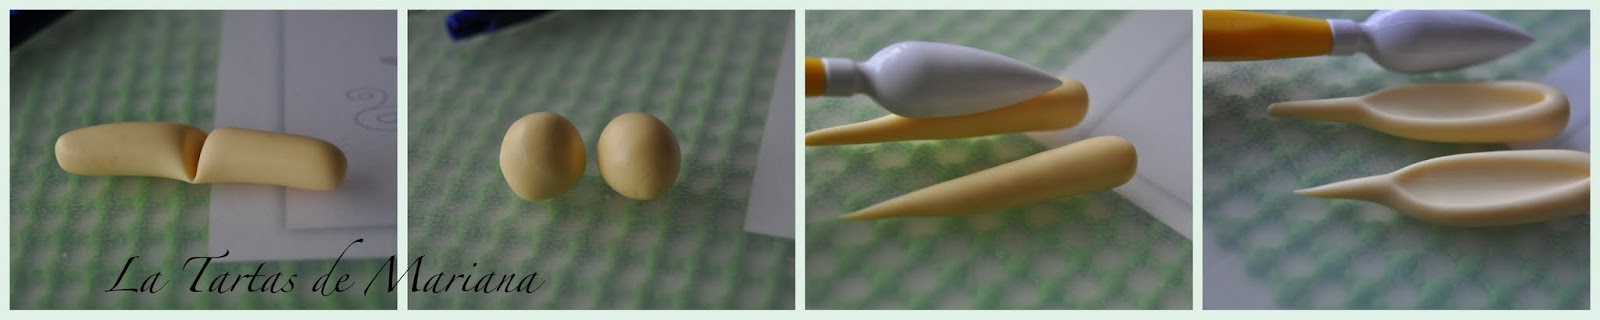
Dos trozos del mismo tamaño  a los que les damos forma esférica.
Los afinamos para formar dos conos, los ahuecamos con una esteca y tendremos unas orejas perfectas!


SOLO NOS QUEDA EL PAJARILLO!
Colocamos dos trocitos de alambre de floristería sobre la cabeza del conejo.
Clavamos allí el cuerpo del pajarillo.
Modelamos una esfera para la cabeza.
Colocamos un trocito de pasta a modo de pico, que dividimos al medio con una esteca.
Y solo nos queda pintarle el ojito con un rotulador  de tinte comestible!
 

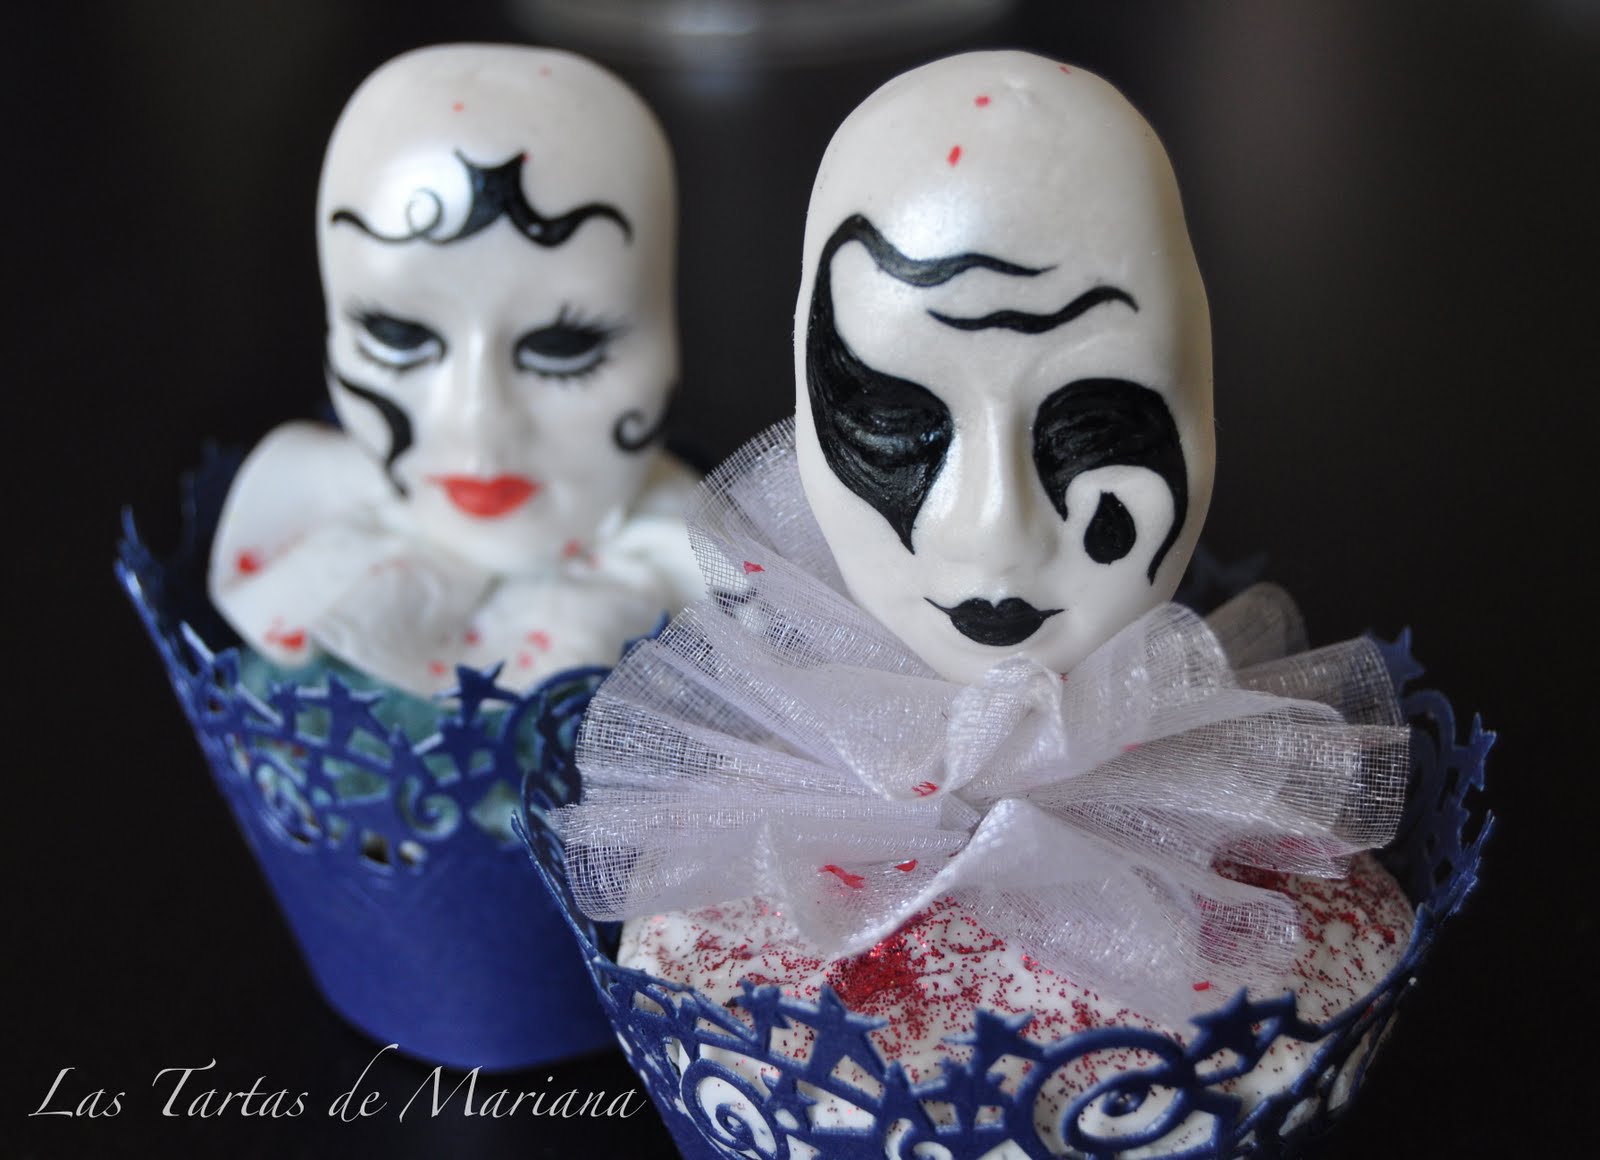
CUPCAKES CON MÁSCARAS VENECIANAS DEL SIGLO XVIII


Las máscaras fueron inspiradas en el Carnaval Veneciano del Siglo XVIII, 
 realizadas a mano en pasta de goma, matizadas con tintes perlados en polvo  de Squires Kitchen y pintadas con tintes comestibles de la misma línea.


Los  sabores elegidos fueron 
muffins de vainilla con almíbar de café y crema de queso mascarpone, 
muffins  de chocolate con confitura de frambuesas
 y muffins de limón con lemon curd de limón y crema de merengue.


1 febbraio 2013

Cupcakes de chocolate....unos pequeños devoradores de galletas invaden mi cocina!

Hoy les traigo unos cupcakes de chocolate, rellenos de dulce de leche y decorados con

buttercrem. Ya con estos datos se nos hace agua la boca!
Quería hacer algo para niños y encontré en la red estos simpáticos personajes Moustros que Comen Galletas!


Cupcakes de chocolate:


Ingredientes para 12 cupcakes:

3 huevos
100 grs. de harina
150 grs. de azúcar
100 grs. de aceite suave
Polvo de hornear
50 grs. de chocolate en polvo Valor.

Montar las dos claras y la mitad del azúcar. Reservar.
Tamizar la harina, el chocolate y la levadura.
Mezclar el azúcar, las yemas, el huevo restante, y batir hasta triplicar el volúmen.
Añadir el aceite.
Añadir a la mezcla anterior los ingredientes secos y las claras montadas.
Hornear a 175 grados durante 15 minutos.


Con un decorazonador de manzanas hice un hueco en el cupcake y lo rellené de dulce de leche.


Luego preparé una buttercream de vainilla para decorarlos:


250 grs. de mantequilla sin sal a temperatura ambiente
450 grs. de azúcar glas
1 cucharadita  de vainilla
6 cucharaditas de leche

Esta receta  de buttercream es de Alma, una de mis musas inspiradoras.


Para la decoración utilicé la boquilla 133 de Wilton y está teñido con color Violeta de Wilton.
Los ojitos los hice  con fondant blanco y negro.


http://www.sweetagus.com/search/label/dulce%20de%20leche