AMICI

Votamiiiiiiiiiiiiiiiiiiii

Visualizzazione post con etichetta cucina per bambini. Mostra tutti i post

11 febbraio 2013

Caramel Apple

Caramel Apple

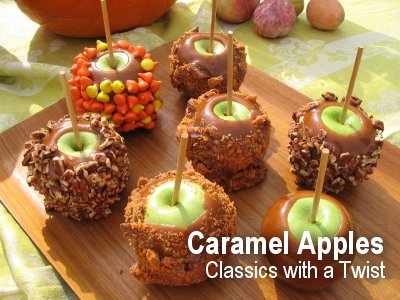
For high-volume production of caramel apples, a sheet of caramel can be wrapped around the apple, followed by heating of the apple to melt the caramel evenly onto it. This creates a harder caramel that is easier to transport but more difficult to eat. Caramel apple production at home usually involves melting pre-purchased caramel candies for dipping, or making a homemade caramel from ingredients like brown sugar, butter, and vanilla. Homemade caramel generally results in a softer, creamier coating.In recent years, it has become increasingly popular to decorate caramel apples for holidays like Halloween. Methods used to do this include applying sugar or salt to softened caramel, dipping cooled, hardened apples in white or milk chocolate, or painting designs onto finished caramel apples with white chocolate colored with food coloring.[1]Classically, the preferred apples for use in caramel apples are tart, crisp apples such as Granny Smith or Fuji apples. Softer, grainy-textured apples can also be used, but are not preferred.

Caramel Apple

Caramel Apple

Caramel Apple

Caramel Apple

Caramel Apple

Caramel Apple

Caramel Apple

Caramel Apple


1 febbraio 2013

LOS QUEQUES DE LA ABUELA MIRA

INGREDIENTES:


  • 4 huevos
  • 3/4 taza de leche
  • una pizca de sal
  • Ralladura de limón (le pueden poner ralladura de naranja o esencia de vainilla pero a mi me gustan más con limón)
  • Harina para Bizcochos cantidad necesaria (o harina común más un sobre de levadura tipo Royal)

PREPARACIÓN

Ponemos en un bol (o en el vaso de la licuadora/batidora)  los huevos más la leche más la pizca de sal.
Comenzamos a batir o licuar mientras le vamos agregando, de a cucharadas soperas colmadas, la harina para bizcochos....¿Cuánta harina? Yo los hago a ojo....el punto justo sería cuando comienza a espesarse...
O sea: Ni líquida ni dura!
 Lo ideal es dejarla reposar un par de horas para que el gluten de la harina trabaje...pero bué! a esa hora de la mañana nadie aguanta tanto tiempo sin desayunar...menos mis peques! así que si no la dejamos hecha de la noche anterior...la usamos sin dejarla reposar!

Vamos a poner a calentar una plancha de hierro (o una plancha de teflón, o una sartén...o lo que tengan!).
 Cuando está bien pero bien caliente, vamos a bajar un poco el fuego y la pintamos con manteca derretida (no hagan lo que yo hice una vez! usé un pincel de cocina que las cerdas eran plásticas y se "achucharraron" todas! glup!).
Ahora tomamos porciones de esta pasta con un cucharón y las vamos echando sobre la sartén caliente (que queden de unos 7 u 8 cm de diámetro me parece que está bien) y dejamos que se cocinen de ese lado.
Las vamos a dar vuelta cuando en la cara de arriba comiencen a formarse burbujitas. Entonces cuidadosamente las levantamos con una espátula, las damos vuelta y la cocinamos del otro lado...y si quieren que los más chiquitos de la casa se rían un poco! en vez de darlas vuelta con espátula, con un revoleo de sartén las hacemos girar en el aire ¡procurando que vuelvan a caer en la sartén!
Yo las hice, esta vez, con una pequeña sartén que conseguí en los chinos, con forma de carita de oso ¡Una monería!

Las sirven acompañadas por nata batida con azúcar y unas gotas de esencia o miel o mermelada o Nocilla o sirope de fresa o DULCE DE LECHEEEEEEE!!!!
MMMMMMMMM!!!!!
 

18 gennaio 2013

Spiced Caramel Popcorn Balls


Spiced Caramel Popcorn balls 1024x744 Spiced Caramel Popcorn Balls

My 12-year-old niece asked out of the blue the other day, as we were driving home from soccer, if we could make popcorn balls. Why yes, of course — and what a great idea! When we were kids, my mom would hang homemade edible ornaments on the tree — popcorn balls and little handfuls of M&Ms — wrapped in cellophane. I loved it. I had forgotten.

She suggested caramel popcorn balls, and so that’s what we did. I found a recipe at AllRecipes and adapted it — found 2 1/2 cups of unpopped kernels to be far too much — the addition of spices (cinnamon, allspice, nutmeg) is optional, but festive.
Spiced Caramel Popcorn Balls
3/4 cup unpopped popcorn
1/4 cup butter
1 cup packed brown sugar
1/2 cup golden syrup or corn syrup
1/2 can sweetened condensed milk
pinch cinnamon, nutmeg and allspice
Pop the popcorn in a hot air popper or on the stovetop; place in a large bowl that has been sprayed inside with nonstick spray.
In a medium saucepan, combine the butter, sugar, and syrup. Bring to a boil and cook, stirring often with a wooden spoon, until a candy thermometer reads 238 degrees F (114 degrees C).
Pour caramel over the popcorn and quickly stir to coat well. Let sit until cool enough to handle, then shape into balls whatever size you like. Makes about two dozen popcorn balls. Wrap them individually in cellophane or plastic wrap.

http://blogs.babble.com/family-kitchen/2010/12/09/spiced-caramel-popcorn-balls/ 

Easy Toffee Popcorn with Buttered Almonds


Popcorn 300x201 Easy Toffee Popcorn with Buttered Almonds

I love a delicious bowl of popcorn for a snack. In fact, I love it so much that a few years ago I purchased a cute little air popper so I could make popcorn for myself whenever I wanted without having to use oil on the stovetop. The other day my daughter asked for the caramel corn she had tried recently at a friend’s house. Though I usually prefer my popcorn plain, I decided to indulge her whim and whip up some toffee glaze and buttered almonds to add to our freshly popped corn. It was so much simpler than I had expected and was so tasty. It was definitely something I won’t be doing every day but is great for a treat. I might even serve it for dessert sometime!

Toffee Popcorn with Buttered Almonds

1/2 cup popcorn kernels
1 stick unsalted butter
1/2 cup brown sugar
1/2 cup light corn syrup
For the Almonds:
1 cup almonds
1 tablespoon unsalted butter
1 large pinch kosher salt

1. Pop the popcorn on the stovetop or in an airpopper and set aside.
2. In a small saucepan over medium heat, melt the butter then add the brown sugar and corn syrup. Stir everything well until the toffee sauce is completely melted together. Stir the popcorn and the toffee sauce together, and allow it to cool slightly. Then make the buttered almonds.
3. To make the buttered almonds, add the  butter to a skillet and melt it over medium heat, and then add the butter and toss them with the salt and butter until the almonds are lightly toasted and coated in the butter.

http://blogs.babble.com/family-kitchen/2011/04/06/easy-toffee-popcorn-with-buttered-almonds/ 

Chocolate Covered Caramel Corn


chocolate covered caramel corn 3 1024x709 Chocolate Covered Caramel Corn
There’s not a thing wrong with caramel corn straight-up, but if you want to upgrade yours – drizzle it with melted chocolate. It’s a great way to doll up store bought stuff if you don’t have time to make some from scratch, but really elevates homemade caramel corn, transforming it into something crunchy, chewy, salty and sweet and chocolatey, all in one.

chocolate chips in baggie 1024x647 Chocolate Covered Caramel Corn
It’s worth starting from scratch and making the caramel corn yourself – there’s a simple recipe below. Once it’s cooled, fill a snack-sized ziplock baggie with chocolate chips, seal and put in a bowl of warm water to melt.
chocolate covered caramel corn 4 1024x682 Chocolate Covered Caramel Corn
Knead the bag gently to help the chocolate melt and get rid of any lumps. Then snip off a corner and squeeze over the caramel corn. Easy.
chocolate covered caramel corn 2 1024x687 Chocolate Covered Caramel Corn
And no chocolate-covered dishes to wash.
chocolate covered caramel corn 1 1024x682 Chocolate Covered Caramel Corn
Let sit until the chocolate sets, then devour. Or share with people you really, really like.
Classic Caramel Corn
6-8 cups air popped popcorn (about 1/4 cup kernels)
1 cup packed brown sugar
1/2 cup corn syrup
1/4 cup butter
1 tsp. vanilla
1/4 tsp. baking soda
1/2 cup peanuts or pecan pieces (optional)
Preheat oven to 250° F. Spray a large bowl with non-stick spray and put the popcorn in it, along with the pecans if you’re using them.
Combine the brown sugar, corn syrup and butter in a medium saucepan and bring to a boil over medium heat. Boil without stirring, swirling the pan occasionally, for 4 minutes. Remove from heat and stir in the vanilla and baking soda. It will foam up at first.
Quickly pour over the popcorn and stir to coat well, adding nuts if you like. Tongs work really well for this! Spread onto a cookie sheet or roasting pan and bake for 30 minutes, stirring once or twice. Cool.

Get in your chocolate fix with Babble’s Best Chocolate-Coconut Cookies!

http://blogs.babble.com/family-kitchen/2011/10/25/chocolate-covered-caramel-corn/ 

Movie Theater Caramel Corn


movie theater caramel corn oscars 200x300 Movie Theater Caramel Corn 

For the love of the Oscars, we’re celebrating the magic of the movies with movie theater caramel corn for our Academy Awards party.
We don’t go to the movies often. By the time we pay for 6 tickets, popcorn and beverages and a box of candy or two, well, let’s just say we could treat ourselves to a lot more than two hours in a theater with kids that often need to use the bathroom in the midst of an integral scene. It’s less than ideal.
Instead, we recreate movie night at home, using Netflix to bring the movies to our living room and our culinary skill to get fresh popcorn and drinks on demand from the kitchen.
My favorite thing about the actual theater, apart from a massive screen and surround sound, is the popcorn and the giant-sized box of candy. We don’t actually eat nor purchase a lot of candy around here, but our annual trip to the theater as a family is an exception. We decided to marry the popcorn and candy together for a real special treat: movie theater caramel corn.


Movie Theater Caramel Corn adapted from Joy of Baking

1/2 cup popcorn kernels
1 1/2 cups sugar
1/2 cup brown sugar
1/2 cup dark corn syrup
1/2 cup water
2 tablespoons unsalted butter
2 teaspoons salt
2 teaspoons baking soda
2 movie-sized boxes your favorite bite-sized candy (M&Ms, Nerds, Reese’s Pieces, Whoppers, Goobers, Raisinets, etc.)

Pop popcorn in air popper or over a stove top. Grease a large stainless steel bowl and place the popped popcorn inside. Line a large baking sheet or two with parchment and set aside.
In a medium to large saucepan mix together sugar, brown sugar, corn syrup and water. Bring to a boil over medium heat. Place a cover on the pan and allow to boil for two minutes. Remove the lid and continue cooking until the mixture reaches 240 degrees F, the soft ball stage. Stir in the two tablespoons of butter until melted.
Let the sugar continue to cook. When the mixture reaches 300 degrees F immediately stir in the salt and baking soda. The mixture will foam. Pour over popped popcorn and stir with wooden or heat resistant spoons, folding popcorn over and over until covered.
Spread the caramel corn over the baking sheets in a thin layer. Immediately sprinkle candy of choice over the caramel corn, pressing lightly to secure into the mix. Allow to cool completely. Break into chunks and serve.
Makes 12 cups caramel corn.

 http://blogs.babble.com/family-kitchen/2011/02/25/movie-theater-caramel-corn/

Homemade Real Caramel Apples


BabbleCaramelApples2 300x200 Homemade Real Caramel Apples

Caramel apple making for most families involves unwrapping store-bought caramels, melting them down, and dipping popscicle-sticked apples into the mixture.  While this is a perfectly reasonable way to make caramel apples (I grew up making them this way), I’ve never quite figured out why I don’t really like caramel apples.  At least, I’d never figured it out until I spent an afternoon making fresh caramel for the teeny apples our family had picked from a local orchard.  The smooth, warmth of homemade caramel made a perfect combination with the flavor of just-picked apples.  So, that’s what I’d been missing, I realized!  The classic, beloved flavor of caramel apples is truly divine when made with real caramel.  This basic recipe, plus a few apples from your neck of the woods is sure to become a favorite snack in your house, too!


Perfect Caramel Apples 

Soft
1 cup heavy cream
3/4 cup light corn syrup
1/2 cup butter
1 cup brown sugar
1 teaspoon vanilla extract
8-12 green apples

In a large saucepan, whisk together cream, corn syrup, butter, and brown sugar.  Bring to a boil over medium-high heat, stirring constantly until the mixture comes to a soft-ball stage (you’ll allow it to boil for about 5-8 minutes to get it to that point.  To check if the caramel has cooked soft-ball stage, drop a small spoonful of caramel into a cup full of ice water.  When the caramel forms a soft, felxible ball, it’s ready.)   Stir in the vanilla then remove the caramel from the stove and allow to cool slighty.  Press popscicle sticks into the center of each apple.  Dip the apples into the warm caramel, then transfer to parchment paper and allow to cool.

 http://blogs.babble.com/family-kitchen/2010/09/17/homemade-caramel-apples/

BabbleCaramelApples 150x150 Homemade Real Caramel ApplesBabbleCaramelApples3 150x150 Homemade Real Caramel Apples


17 gennaio 2013

Rainbow Fudge

This brilliantly bright and bold Rainbow Fudge is a super wonderific choice to take to a party or give as a gift!
Wait, there's more! Read the blog post about this recipe.

Rainbow Fudge

1 hour 30 minutes
13 hours 30 minutes
32 servings

Ingredients

  • 2 cans (14 oz each) sweetened condensed milk (not evaporated)
  • 5 boxes (6 oz each) white chocolate baking squares, chopped
  • 1 1/4 teaspoons vanilla
  • liquid food color (red, blue, green and yellow)

Directions

  1. Line 9 x 5-inch loaf pan with foil.
  2. Divide sweetened condensed milk between 5 microwave-safe small bowls, about 1/2 cup per bowl.
  3. To make the bottom PURPLE layer, add 6 ounces of chopped white chocolate to one bowl of the sweetened condensed milk. Microwave uncovered on High 1 minute; stir until smooth. Stir in 1/4 teaspoon vanilla. Tint PURPLE by adding 9 drops of red food color and 6 drops of blue food color; stir well. Immediately pour fudge mixture in the bottom of a foil lined pan, spreading to edges. Firmly tap pan on counter to even out layer. Place in freezer for at least 15 minutes or until top appears set.
  4. For the BLUE layer, add 6 ounces of chopped white chocolate to one bowl of the sweetened condensed milk. Microwave uncovered on High 1 minute; stir until smooth. Stir in 1/4 teaspoon of vanilla. Tint BLUE by adding 18 drops of blue food color; stir well. Gently pour and spread mixture over PURPLE layer in pan. Firmly tap pan on counter to even out layer. Place in freezer at least 15 minutes or until top appears set.
  5. For the GREEN layer, add 6 ounces of chopped white chocolate to one bowl of the sweetened condensed milk. Microwave uncovered on High 1 minute; stir until smooth. Stir in 1/4 teaspoon of vanilla. Tint GREEN by adding 18 drops of green food color; stir well. Gently pour and spread mixture over BLUE layer in pan. Firmly tap pan on counter to even out layer. Place in freezer at least 15 minutes or until top appears set.
  6. For the YELLOW layer, add 6 ounces of chopped white chocolate to one bowl of the sweetened condensed milk. Microwave uncovered on High 1 minute; stir until smooth. Stir in 1/4 teaspoon of vanilla. Tint YELLOW by adding 12 drops of yellow food color; stir well. Gently pour and spread mixture over GREEN layer in pan. Firmly tap pan on counter to even out layer. Place in freezer at least 15 minutes or until top appears set.
  7. For the top RED layer, add 6 ounces of chopped white chocolate to one bowl of the sweetened condensed milk. Microwave uncovered on High 1 minute; stir until smooth. Stir in 1/4 teaspoon of vanilla. Tint RED by adding 18 drops of red food color; stir well. Gently pour and spread mixture over YELLOW layer in pan. Firmly tap pan on counter to even out layer.
  8. REFRIGERATE at least 12 hours until cold and firm. Cut into 8 rows by 4 rows, trimming edges as desired. If fudge becomes soft during slicing, return to refrigerator to firm up. Store covered in the refrigerator. 
http://www.tablespoon.com/recipes/rainbow-fudge-recipe/1/?utm_source=blog&utm_medium=embed&utm_campaign=recipe-embed

Rainbow Fudge

Color your holiday world like never before with this Rainbow Fudge recipe from our Secret Stash collection — just for Tablespoon.com members!

Fudge is the staple of holiday staples. Dark and rich, it finds its place on cookie plates everywhere this time of year.
But wait! This fudge, this brilliantly bright and bold Rainbow Fudge, will not only color your holiday like a crazy case of Crayolas, it’ll rock your Christmas socks and blow the fuse on Rudolph’s nose! What a super wonderific choice to take to a holiday party.
Come along with Team Tablespoon as we pair up with our kitchen-expert pals down in the Betty Crocker Test Kitchens to make this incredible treat.

Get Prepped

First, organize your stuff. We got down to the kitchen, and this was the scene — the ingredients were all ready to go:
Ingredients for Rainbow Fudge Recipe
And there were 5 beautiful clear bowls lined up in a neat row with about 1/2 cup of sweetened condensed milk in each.
Bowls of Sweetened Condensed Milk
We learned how to line a loaf pan with foil the right way, like this:
How to Line a Loaf Pan with Foil
So now we’re set to make a rainbow!

Melting, Mixing and Colorizing

Grab the first of your five boxes of white baking chocolate. White chocolate can be finicky — we found Baker’s works really well.
White Chocolate to Make Rainbow Fudge
We’ll do one color at a time, so chop up one box of white chocolate at a time.
Chopping White Chocolate for Rainbow Fudge
Add the chopped white chocolate to the sweetened condensed milk in one of the bowls.
Adding Chopped Chocolate to Bowl
Microwave the sweetened-condensed milk and the chocolate choppings on high for 1 minute.
Microwaving White Chocolate and Sweetened Condensed Milk
Stir ’til smooth. Getting sweet enuf for ya yet? Just wait … it gets better!
Stir White Chocolate Mixture Until Smooth
Add 1/4 tsp. vanilla and stir again.
Adding Vanilla to White Chocolate Mixture

Now Let’s Start the Layers

Time to get our colors on. We’ll begin with purple layer ‘cuz we’re laying down the colors in reverse order.

Purple Layer

Using regular food colors, add 9 drops of red and 6 drops of blue.
Adding Red and Blue Food Coloring for Violet Layer
Stir …
Stirring Red and Blue Colors
Keep stirring until completely combined.
Violet Chocolate for Rainbow Fudge Recipe
Pour that into the prepared loaf pan and spread it to the edges.
Pouring Violet Layer for Rainbow Fudge
Tap the pan on the counter to make it burp up the air bubbles. Thwack it nice and flat onto the counter a few times. Air bubbles = holes in the fudge, and we don’t want that!
Tapping Fudge Layer to Get Air Bubbles Out
Then put it in the FREEZER for 15 minutes or until the top appears set. This step is super important because it keeps the layers separate.
Layer of Rainbow Fudge in Refrigerator
And the pretty purple layer is done!

Blue Layer

Now you’re gonna do that exact same thing for all the other colors.
So, chop the chocolate, microwave and melt it with the sweetened condensed milk. Add the vanilla, then add 18 drops of blue food color to get the blue layer.
Pouring Blue Layer for Rainbow Fudge
Tap it on the counter to release the air bubbles and return it to the FREEZER for 15 minutes. Beautiful blue layer … done!

Green Layer

Gumby layer, comin’ up! Same process as before, but add 18 drops of green food color this time.
Pouring Green Layer for Rainbow Fudge
Tap it on the counter, and return it to the FREEZER for 15 minutes. Gorgeous green layer … done!

Yellow Layer

Here comes the sun! Same process as before, but add 12 drops of yellow food color this time.
Pouring Yellow Layer for Rainbow Fudge
Tap it on the counter and return it to the FREEZER for 15 minutes and … the yellow layer’s done!

Red Layer

Rad red on its way! Same process as before, but add 18 drops of red food color.
Pouring Pink Layer for Rainbow Fudge
Tap it on the counter to release the air bubbles like usual, but this time you’re going to refrigerate it instead of freeze it — so place it in the REFRIGERATOR for at least 12 HOURS to harden the whole rainbow brick up.

Finishing it Up

After the rainbow brick has been refrigerated at least 12 hours to firm up, take it out of the fridge and remove the fudge from the pan, foil and all.
Loaf Pan of Rainbow Fudge
Carefully remove the foil from the fudge. The foil can stick, but don’t worry. Just take your time and peel it away.
Removing Foil from Rainbow Fudge
Flip ‘er over and keep peeling…
Removing Rainbow Fudge from Pan
Brick of Rainbow Fudge
Then trim the edges so you have straight sides.
Trim the Edges for Rainbow Fudge
We cut it into rectangle slices, but you can cut it into any size pieces you want.
To make rectangles like we did, mark off about 1″ intervals both directions. No need to be perfect. Just eyeball it up or use a ruler if you want.
Measuring Rainbow Fudge
Then cut your colorful fudge brick into pieces to share.
This fudge is softer than typical fudge, so use a sharp knife. If it gets too soft to slice easily, just return it to the fridge to firm up a bit more.
Slicing Rainbow Fudge
Oh, yah, baby … this is gonna totally make you the bestest guest at the party.
Rainbow Fudge Pieces Ready to Eat
Now, there’s only one thing left to do — clean up the prettiest kitchen mess ever.
Empty Bowls after Making Rainbow Fudge
Here’s the full recipe, so go color your holiday fun!

http://rock-ur-party.tablespoon.com/2011/12/20/rainbow-fudge/