AMICI

Votamiiiiiiiiiiiiiiiiiiii

Visualizzazione post con etichetta Cake Pops. Mostra tutti i post

12 gennaio 2013

Strudel pops


Di piccoli Apple Strudel sullo stecco, ovvero biscotti di frolla ripieni di mele, uvette, cannella... Ma la cosa più bella è che si preparano in tempi rapidissimi!
Quindi... pronti? 3 -2- 1... via!

Servono:
  • un rotolo di frolla già pronta (se invece avete più tempo, potete mettervi a prepararla voi)
  • 1 mela
  • 20 g di burro
  • 2 cucchiai di uvette
  • 2 cucchiaini di pinoli (o noci o nocciole... insomma, quello che avete in casa e che vi piace di più)
  • 2 cucchiai di zucchero di canna
  • una spolverata di cannella
  • 3 biscotti secchi
Ho preparato il ripieno mettendo in un padellino il burro, la mela tagliata a dadini piccoli, lo zucchero, le uvette precedentemente lavate e asciugate, la cannella. Ho fatto andare a fuoco basso una decina di minuti, giusto il tempo di far cuocere la mela. Una volta spento il fuoco, ho aggiunto i pinoli e sbriciolato i biscotti. Mescolato il tutto e lasciato raffreddare. 
Nel frattempo, ho preso la frolla e con uno stampino ho ricavato 24 tondi e ne ho disposti la metà sulla teglia ricoperta con la carta da forno. Con un cucchiaino ho inserito al centro di ognuno un po' di ripieno... così:

Poi ho ricoperto con gli altri dischetti che avevo lasciato da parte e con uno stuzzicadenti ho sigillato i due strati (un po' come per i ravioli, avete presente?!). Ho spolverato tutto con zucchero e cannella e infornato a 180° per una decina di minuti. Una volta cotti, potete mangiarli così come sono (sotto forma di biscotti ripieni) oppure potete infilare degli stecchi di legno (io ho usato le palettine che normalmente si utilizzano per il caffè) quando sono ancora caldi. E voilà... secondo me sono molto carini. 

Buona colazione divertente (per grandi e piccini)!
 

10 gennaio 2013

Cake pops


  • Ho preparato qualche ora prima il pan di spagna , quando la torta è completamente fredda tagliatela in pezzi e sbriciolatela con le mani, non con il mixer, dentro una grossa ciotola. Se usate una torta chiara tagliate via le parti marroni così l’interno del cake pop avrà un colore uniforme.
  • Mescolate le briciole con una ganache al cioccolato preparato con  mascarpone e nutella; arrivate ad una consistenza morbida e umida che vi permetta di fare delle palline grandi come una noce.
  • Fate le palline arrotolandole tra le mani come se fossero polpette; potete usare un cucchiaio dosatore per gelato per semplificare il dosaggio. Lavate ed asciugate spesso le mani per facilitare la modellazione.
  • Man mano che le componete, mettete le palline su un vassoio coperto con carta da forno; quando avrete terminato copritele con pellicola e passatele in frigo per qualche ora o in freezer per 15 minuti: devono essere ferme ma non congelate.
  • Fondete il cioccolato o i candy melt nel forno a microonde (in due fasi, mescolando a metà procedimento) o a bagnomaria, ma fuori dal fuoco (una ciotola appoggiata su acqua bollente, mescolando finchè non sono sciolti). Per farlo usate una ciotola profonda: vi faciliterà nella fase di copertura. Potete aromatizzare e tingere i candy melt con olii e coloranti per caramelle (sono specifici in quanto privi di componenti acquose).
  • Forate il polistirolo che terrà i vostri cake pop in piedi mentre asciugano usando gli stecchini. 
  • Togliete dal frigo pochi cake pop alla volta (se erano in freezer, è ora di metterli in frigo). Procedete con un cake pop alla volta.
  • Immergete la punta dello stecchino nella copertura per 2 cm (questo aiuterà a fissarlo al cake pop) e infilatelo fino al centro della pallina.Immergete ora con un unico movimento verticale la pallina nella copertura, senza muoverla di lato o girarla perché potrebbe sbriciolarsi. Potete aiutarvi con un cucchiaio per far colare la copertura su tutta la pallina.Assicuratevi che la copertura arrivi ad unirsi alla base dello stecchino senza lasciare buchi. Se vi sembra che la consistenza dei candy melt sia troppo densa, scaldateli di nuovo aggiungendo un cucchiaino alla volta di burro o grasso vegetale.
  • Sollevate la pallina e tenendola inclinata sopra il contenitore della copertura fate colare l’eccesso di cioccolato o candy melt: potete rotearla con delicatezza e dare dei colpetti al polso della mano che la regge (una vibrazione più forte, data ad esempio battendo direttamente il bastoncino sul bordo della ciotola, farebbe rompere la pallina). Infilate il cake pop nel polistirolo.
  • per la decorazione dei cake pop:


      1. Lavorate la pasta di zucchero, stendi e taglia con il 
      1. ho spennellato con acqua la stella di pasta di zucchero, 
      1. ho aggiunto lo zucchero colorato in precedenza.
  • Lasciate asciugare i cake pop almeno 15 minuti prima di servirli.

 http://luciapasticciona.blogspot.com/

27 dicembre 2012

Tiered Cake POPs Recipe


Tiered Cake POPs picture 

Inspired by the wonderful Marie Antoinette film with Kirsten Dunst. I love that scene with all the cakes and all the shoes! Heaven.

Ingredients

 15–20 x 1-oz (30-g) cake balls (see recipe here)
 Candy package1
 Candy7 Ounce
 Nonpareils or sprinkles of your choice
 11/4-inch (3-cm) square cookie cutter
 5/8-inch (1.5-cm) square cookie cutter
 15–20 lollipop sticks
 Small piping bag

Directions

1. To make the tiers for the cake, flatten the cake ball
and cut out the largest shape using the larger cookie cutter. Gather the remaining pieces
of cake ball and push them into the smaller cookie cutter to create the second tier.
2. Prepare the candy melts (see page 25). Dip the base of the top half of the cake into the blue candy melt and attach to the bottom half of the cake.
Let harden in the freezer for 10 minutes.
3. Dip the tip of a lollipop stick into the blue candy melts and insert it three-quarters of the way through the cake, so that both tiers are attached. Dip the entire POP into the candy melts. Let set.
4. Fill a small piping bag with the white candy melts. Pipe around the edge of the bottom tier and along the sides. While the candy melt piping is still wet, sprinkle with nonpareils. Let dry, cover, and store in the refrigerator.

This recipe was contributed by Clare O’Connell, author of Pop Party.
To purchase POP Party visit www.amazon.com.
 

How to Make Easter Egg Cake Pops

Easter Egg Cake Pops photo 

For an easily printable recipe, please see the Easter Egg Cake Pops recipe page.
Start by gathering your ingredients:
  • One 9 x 13 cake, any flavor
  • One can (16 oz) prepared frosting, any flavor
  • 4 cups white candy coating
  • Assorted sprinkles and small candies for decorating
  • About 48 lollipop sticks
I like to keep a spring theme by using lemon cake and frosting, but you can use any flavor of cake and frosting you'd like.

Easter Egg Cake Pops photo

Place the cake in a large bowl, and crumble it roughly with your hands. Break it up until it's entirely in fine crumbs.

Easter Egg Cake Pops photo

Once it's finely crumbled, add about 2/3 of the frosting to start with. The exact amount needed depends on how moist the cake is and on your personal preference, so we're going to start with a portion of the frosting and only add more if it's necessary.

Easter Egg Cake Pops photo 

Begin to mix the frosting and the cake crumbs together with you hands, working until the mixture is evenly moistened. You want the cake mixture to easily hold together when you press it into a ball, but still retain a little texture. My personal preference is to have some “crumb” left to the crumb, so that it is not just a gooey ball. Of course, tastes vary, so if it seems as if the cake mixture is too dry, or you like a gooier taste, add more frosting until you're happy with the taste and texture. Make sure that when you're finished mixing, the cake holds together well when you squeeze it into a ball.

Easter Egg Cake Pops photo 

Using a cookie scoop or teaspoon, form the mixture into small balls about 1 inch in diameter. Roll the balls into oblong shapes between your palms, and pinch one end until it's thinner so that they resemble egg shapes. If you are using a standard 1-tablespoon cookie scoop, you should get about 48 eggs from this recipe.

Easter Egg Cake Pops photo 

Once all of the cake pops are formed, place them on a foil- or waxed paper-covered baking sheet, and put them in the freezer to firm up, for about 30 minutes.

Easter Egg Cake Pops photo 

After the Easter egg pops have been frozen, remove them from the freezer. Melt the candy coating in the microwave and stir until completely smooth. Poke a skewer into the bottom of each "egg" to make a small hole. Dip the tip of a lollipop stick into the melted coating, then push the coating-covered tip into the hole in the egg. The coating will soon solidify and help hold the stick in place. Repeat until all of the eggs have been skewered.

Easter Egg Cake Pops photo 

Holding a cake pop by the stick, dip the cake entirely in the candy coating until it is covered. Remove it from the coating and gently tap the stick against the side of the bowl to remove excess coating.

Easter Egg Cake Pops photo 

You can either hold the cake pops until the coating sets up (which will not take long with cold cake!) or stick the cake pop in a piece of Styrofoam to set. I like to use old styrofoam from packages--it's cheap, convenient, and works well for holding cake pops. Repeat until all of the eggs are dipped. If they start to get too soft and move too much on their sticks, return them to the freezer very briefly until they firm up.

Easter Egg Cake Pops photo 

1. Once all of the Easter egg cake pops have been dipped, it's time to decorate! Pour some of the remaining melted candy coating into a paper cone or a plastic bag with the tip cut off, and pipe on lines, dots, or squiggles for decorations.
2. While the coating is still wet, cover it with sprinkles or candies to make colorful designs and patterns on your eggs. After it dries, brush off the extra sprinkles not clinging to the coating to reveal your designs.
3. Alternately, you could apply light corn syrup with a paintbrush and use this to affix sprinkles and candies to your eggs instead.

Easter Egg Cake Pops photo 

Let the coating or corn syrup dry completely, and your Easter egg cake pops are finished! Store the cake pops in an airtight container in the refrigerator for up to a week. For the best taste and texture, allow them to come to room temperature for about 20 minutes before serving.

http://candy.about.com/od/eastercandyrecipes/ss/How-To-Make-Easter-Egg-Cake-Pops.htm


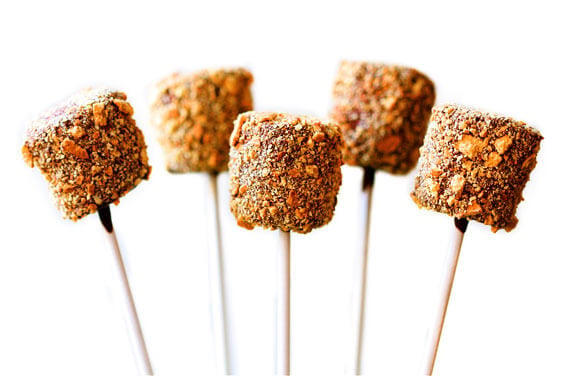
S’mores Pops

s'mores-pops 

It all began with, of course, sugary lollipops and popsicles as a kiddo. Then over the years progressed to delicious little hors d’oeuvres (and especially cheeses) on toothpicks. Then over the last few years, have adored and enjoyed trying Bakerella’s trend of cupcakes on a stick (“cupcake pops”).

The best part was that they were a total breeze to make. And way fun!! I ended up whipping them up alone during a free half hour after work, but these would be a blast to make with a group or especially with kids! They dry within 10-15 minutes, so they can be enjoyed immediately. (Or even more immediately if you’re into warm melted chocolate…mmmm….)
Will definitely be making s’more of these soon! (I know…couldn’t resist!) ;)


s'mores-pops-setup

Ingredients:
  • 1 bag large marshmallows
  • 1 package semi-sweet chocolate chips
  • 1 package cinnamon or honey graham crackers (about 9 long/large crackers) – or just buy graham cracker crumbs
  • lollipop sticks (available in cake decorating aisles)
Method:
Begin by twisting the lollipop sticks until they are securely in the middle of the marshmallows. (Insert them on the flat, not rounded, side of the marshmallows. Then push them in until they almost pop through.) Then place the graham crackers in a strong ziplock bag, and use a rolling pin (or whatever you’d like) to crush them until they are finely ground. Then place them in a small bowl.
Then heat the chocolate chips in a double-boiler or (carefully!) in the microwave until they are melted and somewhat runny.
While holding the stick, carefully dip a marshmallow in the chocolate mixture until completely covered. Then gently roll the sides and top of the marshmallow in the graham cracker crumbs until they are well-coated. Place on a plate or on wax paper to let cool and dry. Repeat with remaining marshmallows.


s'mores-dipping

Tip:
If your melted chocolate mixture is still too thick, stir in a spoonful or two of shortening until it reaches your desired consistency. I know it’s not the best for nutrition, but it’s the best chocolate thinner. :) (Hint: never, ever add water!)

Basic cake balls

Recipe: Basic cake balls 

These bite sized cake balls look like truffles but taste like cake. Give them away as party favours or serve them as dessert.

Cake balls are bite-size balls made of crumbled cake mixed with frosting and covered in candy coating. They are super-easy to make and form the basis of endless variations of decorated cake pops and cupcake bites.  

Cake-Balls-Guide-550.jpg 

Ingredients
  • 18.25-ounce box cake mix
  • 9 x 13" cake pan
  • Large mixing bowl
  • 16-ounce container ready-made frosting
  • Large metal spoon
  • Wax paper
  • 2 baking sheets
  • Plastic wrap
  • 32 ounces (2 pounds) candy coating
  • Deep, microwave-safe plastic bowl
  • Toothpicks
  • Resealable plastic bag or squeeze bottle (optional)

 Directions

1
Bake the cake as directed on the box, using a 9-by-13-inch cake pan. Let cool completely.

2
Once the cake is cooled, get organized and set aside plenty of time (at least an hour) to crumble, roll, and dip 4 dozen cake balls.

3
Crumble the cooled cake into a large mixing bowl. You should not see any large pieces of cake. Add three-quarters of the container of frosting. (You will not need the remaining frosting.) Mix it into the crumbled cake, using the back of a large metal spoon, until thoroughly combined. If you use the entire container, the cake balls will be too moist.

4
The mixture should be moist enough to roll into 1 1/2-inch balls and still hold a round shape. After rolling the cake balls by hand, place them on a wax paper­covered baking sheet.

5
Cover with plastic wrap and chill for several hours in the refrigerator, or place in the freezer for about 15 minutes. You want the balls to be firm but not frozen.

6
If you're making a project that calls for uncoated cake balls, stop here and proceed to decorate the cake balls, following the project instructions.

7
Place the candy coating in a deep, microwave-safe plastic bowl. These bowls make it easier to cover the cake balls completely with candy coating while holding the bowl without burning your fingers.

8
Melt the candy coating, following the instructions on the package. Microwave on medium power for 30 seconds at a time, stirring with a spoon in between. You can also use a double boiler. Either way, make sure you do not overheat the coating.

9
Now you're ready to coat. Take a few cake balls at a time out of the refrigerator or freezer to work with. If they're in the freezer, transfer the rest of the balls to the refrigerator at this point, so they stay firm but do not freeze.

10
Place one ball at a time into the bowl of candy coating. Spoon extra coating over any uncoated areas of the cake ball to make sure it is completely covered in candy coating. Then lift out the cake ball with your spoon. Avoid stirring it in the coating, because cake crumbs can fall off into the coating.

11
Holding the spoon over the bowl, tap the handle of the spoon several times on the edge of the bowl until the excess coating falls off and back into the bowl. This technique also creates a smooth surface on the outside of the cake ball.

12
Transfer the coated cake ball to the second wax paper­covered baking sheet to dry. Let the coated cake ball slide right off the spoon. Some coating may pool around the base of the ball onto the wax paper. If so, simply take a toothpick and use it to draw a line around the base of the cake ball before the coating sets. Once the coating sets, you can break off any unwanted coating. Repeat with the remaining cake balls and let dry completely.

13
If you have extra candy coating left over, pour it into a resealable plastic bag (and then snip off the corner) or into a squeeze bottle and drizzle it over the tops in a zigzag motion to decorate.

14
You can make the cake balls ahead of time and store them in an air-tight container on the counter or in the refrigerator for several days.
Tips

  • The cake balls will be easier to roll if you wash and dry your hands periodically during the rolling process. Dry your hands completely each time, and make sure you don't get water in the candy coating, as that can make it unusable.
  • You can use a mini ice-cream scoop to get uniform-size cake balls.
  • If you don't need or want to make 48 cake balls, simply divide the cake in half for 24 cake balls or in quarters for 12 and freeze the remaining cake for later use. Remember to reduce the amount of frosting proportionally.
Makes 48 cake balls
http://www.styleathome.com/food-and-entertaining/recipes/recipe-basic-cake-balls/a/32572

Cake pops

Recipe: Cake pops 

These cake pops are so cute you can give them away as party favours.

Cake pops are based on the same idea as cake balls, with the addition of a lollipop stick and a different approach to dipping. The lollipop sticks increase the cuteness factor, making them perfect for party favours and gifts.

Cake-Pops-Guide-550.jpg

Ingredients
  • 18.25-ounce box cake mix
  • One 9-by-13-inch cake pan
  • Large mixing bowl
  • 16-ounce container ready-made frosting
  • Large metal spoon
  • Wax paper
  • Two baking sheets
  • 48 ounces (3 pounds) candy coating
  • Plastic wrap
  • Deep, microwave-safe plastic bowl
  • 48 paper lollipop sticks
  • Styrofoam block
Directions
1 Bake the cake as directed on the box, using a 9 x 13" cake pan. Let cool completely.

2
Once the cake is cooled, get organized and set aside plenty of time (a couple of hours) to crumble, roll, and dip 4 dozen cake pops.

3
Crumble the cooled cake into a large mixing bowl. You should not see any large pieces of cake.

4
Add three-quarters of the container of frosting. (You will not need the remaining frosting.) Mix it into the crumbled cake, using the back of a large metal spoon, until thoroughly combined. If you use the entire container, the cake balls will be too moist. The mixture should be moist enough to roll into 1 1/2-inch balls and still hold a round shape. After rolling the cake balls by hand, place them on a wax paper­covered baking sheet.

5
Cover with plastic wrap and chill for several hours in the refrigerator, or place in the freezer for about 15 minutes. You want the balls to be firm but not frozen.

6
Place the candy coating in a deep, microwave-safe plastic bowl. These bowls make it easier to cover the cake balls completely with candy coating while holding the bowl without burning your fingers.

7
Melt the candy coating, following the instructions on the package. Microwave on medium power for 30 seconds at a time, stirring with a spoon in between. You can also use a double boiler. Either way, make sure you do not overheat the coating.

8
Now you're ready to dip. Take a few cake balls at a time out of the refrigerator or freezer to work with. If they're in the freezer, transfer the rest of the balls to the refrigerator at this point, so they stay firm but do not freeze.

9
One at a time, dip about 1/2 inch of the tip of a lollipop stick into the melted candy coating, and then insert the lollipop stick straight into a cake ball, pushing it no more than halfway through.

10
Holding the lollipop stick with cake ball attached, dip the entire cake ball into the melted candy coating until it is completely covered, and remove it in one motion. Make sure the coating meets at the base of the lollipop stick. This helps secure the cake ball to the stick when the coating sets. The object is to completely cover the cake ball and remove it without submerging it in the coating more than once. A small, deep plastic bowl is very helpful during this step. If you do resubmerge the cake pop, the weight of the candy coating can pull on the cake ball and cause it to get stuck in the coating.

11
The thinner the consistency of your coating, the easier it will be to coat the cake pops. If you find that your coating is too thick, add some shortening or paramount crystals to help thin it and make the coating more fluid.

12
When you remove the cake pop from the candy coating, some excess coating may start to drip. Hold the cake pop in one hand and use the other hand to gently tap the first wrist. Rotate the lollipop stick if necessary to allow the excess coating to fall off evenly, so one side doesn't get heavier than the other. If you didn't completely dunk the cake pop, this method of tapping and rotating generally takes care of that. The coating will slowly slide down the surface of the cake ball until it reaches the lollipop stick.

13
If too much coating surrounds the base of the lollipop stick, you can wipe the excess off with your finger. Simply place your finger on the stick right under the cake ball and spin the lollipop stick, allowing any excess coating to fall off and back into the bowl of coating. When most of the excess coating has fallen off and it is no longer dripping, stick the cake pop into the prepared Styrofoam block. Repeat with the remaining cake balls and let dry completely.

14
Store the cake pops in an airtight container on the counter or in the refrigerator for several days. You can also cover them in small treat bags, tied with a ribbon, and leave them in the Styrofoam block on the counter.

Tips
  • Make the cake the day before and let it cool overnight.
  • Use a toothpick to encourage the coating to cover any small exposed areas or to make sure it surrounds the lollipop stick.
  • Make sure the cake balls are chilled and firm when you dip them. If they are room temperature, they are likely to fall off the lollipop sticks into the melted candy coating. You can always place them back in the freezer for a few minutes to quickly firm them up again.
  • Poke holes in the Styrofoam block before you start dipping the pops. Just use one of the lollipop sticks to make holes about 2 inches apart.
  • For fun, experiment with different colors of candy coating.
  • Cake pops need more attention and therefore a little more time to complete than the cake balls. Set aside a couple of hours.
  • When using the cake pop method, you can also make the balls in different shapes. Just roll them into balls, place in the freezer or refrigerator to firm, and then mold into your desired shape.

For truffle-like cake pops, check out our basic cake balls recipe.

cake-pops.jpg 


BUY THIS BOOK
 
Excerpted from Cake Pops by Angie Dudley. Published by Chronicle Books. Copyright 2010 by Chronicle Books. All rights reserved. Reprinted by permission of Chronicle Books.  


http://www.styleathome.com/food-and-entertaining/recipes/recipe-cake-pops/a/32575 

Pie Pops


pie pops recipe with step by step pictures

Pie pops – a whimsical twist on a regular pie.
They are tiny, they are cute, and they taste just like a bite of a nice pie.
I love desserts like these.
Inspired by a lovely lady called Bakerella, I knew I needed to get these pies into my life as soon as possible.
Some things just need to be done immediately.
To make my version of pie pops I decided to go with the recipe that I use to make my Mini Apple Pies. Only, I have made the crust a little more sweet and I finally decided to replace the apple filling with jam.
To make your own version, you can sure use any filling you really like. What I recommend is for the filling to be on the denser and sweeter side. It should be dense because it will leak less and it should be really sweet because you can only use a little for one pop.
Here’s my version of the pie pops, step-by-step-by-step-by-step… by step:

pie pops recipe with step by step pictures ingredients

This is what we need.

pie pops recipe with step by step pictures, preheat the oven to 350 F (175 C), place the flour, salt, and sugar (5 tablespoons) in the bowl of your electric mixer. First, stir with a spoon to combine, then  add the butter (cubed) and mix until the mixture resembles coarse meal

1. Preheat the oven to 350 F (175 C).
2. Place the flour, salt, and sugar (5 tablespoons) in the bowl of your electric mixer. First, stir with a spoon to combine, then  add the butter (cubed) and mix until the mixture resembles coarse meal.

Pie pops recipe with step by step pictures. Pour in 1/4 cup (60 ml) water in a slow, steady stream until the dough holds together when pinched. If necessary, pour more water. Mix for only about 30 seconds. Cover the dough with plastic wrap and refrigerate for about twenty minutes before using.

3. Pour in 1/4 cup (60 ml) water in a slow, steady stream until the dough holds together when pinched. If necessary, pour more water.
Mix for only about 30 seconds.
4. Cover the dough with plastic wrap and refrigerate for about twenty minutes before using.
But… oh, wait… I forgot something!
  
Pie pops recipe with step by step pictures.

Aah, now everything is alright.
  
Pie pops recipe with step by step pictures. Then place the dough on floured surface and roll it out into about 0.1-0.2 inch (3-5 mm) thickness.

5. Then place the dough on floured surface and roll it out into about 0.1-0.2 inch (3-5 mm) thickness.
I liked them better when they were a little more thin.
  
Pie pops recipe with step by step pictures. Now grab a cookie cutter. This one is 2.5 inch (6 cm) in diameter. Dip the cutter in flour.

6. Now grab a cookie cutter. This one is 2.5 inch (6 cm) in diameter.
Dip the cutter in flour.

Pie pops recipe with step by step pictures. Cut out circles.

7. Cut out circles.
  
Pie pops recipe with step by step pictures. Line a baking sheet with parchment paper, Place the dough circle onto the sheet. Press down a lollipop stick or a wooden skewer in the dough. Pinch the dough a little to cover the stick.

8. Line a baking sheet with parchment paper.
9. Place the dough circle onto the sheet.
10. Press down a lollipop stick (or a wooden skewer) in the dough. Pinch the dough a little to cover the stick.

Pie pops recipe with step by step pictures. Apple filling in a stainless steel bowl.

First I thought I’d only use apple filling for my pie pops, but this filling turned out to be not enough. You cannot get much filling into the pops, that’s why I needed something more flavor-intense.
Jam!
  
Pie pops recipe with step by step pictures. Filling pie pops.

10. So I filled some pops with jam , and some with the jam-apple combination.
I like them both.

Pie pops recipe with step by step pictures. Place another circel on top of the filling and press the edges with your fingers.

11. Place another circle on top of the filling and press the edges with your fingers.
  
Pie pops recipe with step by step pictures. Seal and decorate the edges with a short piece of a lollipop stick or a wooden skewer.

12. Seal and decorate the edges with a short piece of a lollipop stick (or a wooden skewer).

Pie pops recipe with step by step pictures. Using a short piece of lollipop stick helps you not to mess up the neighboring pie pops when you seal the tow pieces of dough together. Continue with all dough circles, then re-roll the scraps and cut out some more circles.

Using a short piece of lollipop stick helps you not to mess up the neighboring pie pops when you seal the two pieces of dough together.
13. Continue with all dough circles, then re-roll the scraps and cut out some more circles.


Pie pops recipe with step by step pictures. Mix the egg yolk with the milk and brush the top of each pie pop with this mixture. Using a sharp knife, cut three vents in each pie. Bake in the preheated oven at 350 F (175 C) for about 20-25 minutes or until golden-brown.

14. Mix the egg yolk with the milk and brush the top of each pie pop with this mixture.
15. Using a sharp knife, cut three vents in each pie.
16. Bake in the preheated oven at 350 F (175 C) for about 20-25 minutes or until golden-brown.

pie pops recipe with step by step pictures

Remove from the oven, let cool, and enjoy!
(This recipe was inspired by Bakeralla.com. Yield: 25-30 pops.)

http://zoomyummy.com/2011/11/23/pie-pops/ 

Chocolate Covered Peanut Butter Cheesecake Pops


The above picture is what this dessert was supposed to look like...mine didn't turn out so pretty! But they still tasted good! I found this recipe on www.foodnetwork.com while looking for a new dessert recipe for our annual girls' Thanksgiving/Holiday dinner. It looked and sounded good and it did taste good and I did get good reviews from the girls. But it was a little more difficult to make and I think the next time I make it, instead of putting it in the fridge overnight, I will freeze it so when I cut it, it won't fall apart on me and fall off the sticks. The cheesecake was so soft, I ended up taking out the sticks and drizzling chocolate over it. It worked. Oh and next time, I'll be more careful and not cut my finger open with the scissors while cutting the sticks in half!

Ingredients:

1 1/2 cups dark brown sugar
1 1/2 lb cream cheese, at room temp.
1/2 cup heavy cream
2 large egg yolks
1 tbsp pure vanilla extract
1 3/4 cup creamy peanut butter

Chocolate:

5 tbsp veggie shortening
12 oz semisweet or bittersweet chocolate chips (I used Ghiradelli chocolate chips)

Wooden pop sticks (I used cheap wooden skewers that I cut int half)

For the cheesecake: Position rack in the middle of the oven and preheat to 325 degrees. Line a 8-in by 8-in baking dish with foil letting long flaps overlap on each side. Spray foil with nonstick cooking spray.

Break up the brown sugar to remove all lumps. In a standing mixer with the paddle attachment, beat the cream cheese and sugar on medium speed until smooth. Add the cream and beat slowly; then add the yolks and vanilla mixing until just combined. Gently stir in peanut butter. Make sure not to over beat the mixture otherwise it can cause the cheesecake to crack.

Pour and evenly spread the batter in the prepared pan. Bake for 15 minutes. Open the oven to release some heat, then lower the temperature to 200 degrees. Continue to bake the cheesecake until the outside is set but the center is still loose, for about 45 minutes. Turn off the oven, and cool cheesecake in the oven for 45 more minutes. Cover and refrigerate at least 8 hours or overnight.

Lift cheesecake from the pan by lifting up the foil. Transfer to a cutting board. Cut into 1 1/2-inch cubes. Stick a wooden pop stick halfway into each bar and freeze for 1 hour.

Meanwhile, place shortening and chocolate chips in a microwave safe bowl and heat the chocolate at small intervals, mixing well in between.

Dip the cheesecakes into the chocolate mixture, and stand on waxed paper to set, about 5 minutes. At this point, I put them in the freezer to set more quickly. Serve cold (straight from the fridge), or freeze up to 2 weeks. (Left out, the cheesecake tends to melt a little.)


Adding the cream...


Mixing up the ingredients...


After the peanut butter was added...


Cutting up the cheesecake...


Cheesecake with the sticks in before dipped in chocolate...


Finished product, minus the sticks...Enjoy!
 
http://recipesbynm.blogspot.com/2011/01/chocolate-covered-peanut-butter.html

The Basic Cake Pop (Plus Other Tips)


Cake pops, a Bakerella creation, are a lot of fun to make because they can take on so many personalities. When I made Penguin Pops in August, I loved the decorating, but I was a little frustrated with the process - the dough refrigeration seemed to cause problems.

I've done some experimenting since then, and here is my updated tutorial. Highlights -  refrigeration causes cracking and moisture, and cake pops can be made just as easily at room temperature.

Supplies

Boxed cake mix (I used Betty Crocker Chocolate Fudge, 18.25 oz)
Can of frosting (I used Betty Crocker Milk Chocolate, 16 oz)
Candy Melts (I used Wilton White Candy Melts)
Decorations (these are just some sprinkles I already had)
Small bags and ties for packaging (optional)

Step 1. Bake cake mix according to instructions on package. Let cake cool completely.

Step 2. Melt the Wilton melts. This can be done in the microwave (heat in 30 second to 1 minute intervals, stirring between each interval) or in a chocolate melter (keep on "melt" setting for melting, mixing and dipping.) The advantage to a chocolate melter is that it will keep the chocolate at a constant temperature during the entire dipping process.

When chocolate is melted, it will still be thick. To thin the chocolate, add small amounts of vegetable shortening, mixing between additions, until the chocolate is smooth. For a 14 oz package of melts, you will need a total of 1 to 2 tablespoons shortening. (Don't add too much or it may end up tasting like shortening.)

Step 3. Transfer the cooled cake to a bowl, and break into crumbs using a fork. 

The dough is made by mixing frosting into the cake crumbs. Start by adding 1/2 can of frosting. Mix until combined, then test to see if you can form a ball with your hands. Squeeze the dough together, then roll between your palms. If the ball cracks or falls apart, continue adding small amounts of frosting until a ball can be formed. (This will be about 3/4 of the can in total, but the exact amount depends on the specific cake and frosting.)

Be careful not to add too much frosting, or the dough will become sticky and difficult to work with. (And will have a funny texture when eaten.)


Step 4. Roll dough into cake balls with clean hands and arrange balls on a Silpat or parchment paper-lined baking sheet. Each ball should be about 1-1/4 inches in diameter.


Step 5. Attach a lollipop stick to a cake ball by dipping the tip of the stick in the melted chocolate, then inserting the stick into cake ball (about 3/4 of the way into the cake ball.) Let the chocolate set so that the balls won't fall off the sticks during dipping.


Step 6. Dip cake pops in chocolate until chocolate covers the entire ball. Take pops out of the chocolate and tap the cake pop stick against the side of the bowl or melter while spinning, to remove excess chocolate. Add sprinkles while chocolate is still wet.


Place the pops in a Styrofoam block or in a small cup to allow them to dry before packaging. (Let them sit for at least an hour in a cool spot of your kitchen.)


A Few Other Thoughts on Cake Pops:
  • Consider this "cake dough" on a stick - it won't have the same texture as cake.
  • Wilton melts are already tempered - the shortening is only added to change the consistency. Adding vegetable oil does not work as well as shortening.
  • Chilling finished cake pops can cause the chocolate to become soft at room temperature (and make a sticky mess when you try to package them.)
  • Avoid getting any water in your melted chocolate (check food coloring ingredients if you plan to dye the melts) or the chocolate will seize up and become grainy.
  • You can substitute home-made cake and frosting, but the proportions for the dough may be different.
  • Chocolate bark can be substituted for the candy melts, though you may have to play around with how much shortening you add. 
  • Cake pops should be good for up to a week (no refrigeration needed.)
  • Check out Bakerella's site for all sorts of fun decorating inspiration! 
http://www.the-crafty-penguin.com/2010/10/basic-cake-pop-plus-tips-and-tricks.html