

Well, it’s time for me to finally get around to decorating our game room and I am less than motivated by this color! In fact, the rule of thumb that you should never cut your hair when pregnant should also include…or pick out a paint color (at least in my case;) It screams 1st trimester nausea to me every time I look at it!
Fast forward two years later and I finally caved!!!

I am still so in love with this piece after two years and I love it even more with its modern look! I covered up the first trimester green with 2 fresh coats of Behr Cozy Cottage in satin! I also changed out the top and bottom trims for something a little more modern as well as the pulls!
Here’s what I did!

I purchased 1×2 and 1×3 select pine boards. 1×3′s for the bottom trim and 1×2′s for the top!

I also purchased sticks of cove molding to place underneath the 1×2′s.

I placed the 1×2′s flat side down on the very top of the unit and let them hang over the edge to be flush with the cove molding. I attached them with Liquid Nails and followed up with a few finishing nails.

I did have to miter the edges and it is NOT difficult! I used my compound miter saw and there are hard stops for 45 degree mitered angles. I just cut and caulked!


I also used Liquid Nails and finishing nails to attach the 1×3 boards for the base trim and I swapped the knobs for my favorite pulls that I purchase at Home Depot for about $5 each. They are a little pricey but oh so worth it!

I finally have the motivation I need to decorate our game room! This was the first building project I ever tackled and if I could do it with ZERO building experience…anyone can;)
If you missed the step-by-step tutorials I shared as I was building this unit you can follow the links below!!
Step 1
Ana is a carpenter who makes knock off furniture on the cheap…and she is generous enough to share her detailed plans with the blogging world! Not only does she offer the plans for FREE, she gives you the exact cutting deminsions, a supply list and detailed how to’s on many techniques she uses when building!

Have you
ever looked through a Pottery Barn Kids magezine and longed for
playroom storage just like this? Well, I haven’t simply because they
are so out of my budget, so I glance but I never let it enter my mind
but that is about to change! Ana offers the plans for this storage
system and PLEASE believe me when I say ANYONE can make this ~ NO SAW
NEEDED! It may be a little overwhelming for you when you first read the
plans so I am going to take you with me on my journey to conquer the
largest piece of furniture I have ever made from scratch. I am starting
with the outside bases. You can see the plans for it HERE!

When I said NO SAW NEEDED that is because Home Depot will cut all of the measurements you need for FREE!

I took my supply list along with all of the measurements I needed to my local Home Depot.

This is
Stephan. I told him what types of wood I needed and how I wanted them
cut. He picked them out for me, carried and cut them. I just told him
the measurements as he went. (I did get home with a piece that was cut
too short. I took it back the next day and they replaced it at no extra
charge. However, for the next set I will bring my tape measure with me
and make sure they are right before I leave so I don’t have to make
another trip).

These suckers spank my circular saw!

and here
are all of my pieces (because they were cut I was able to fit them in
my backseat and they were very easy to handle)! FYI: I used 3/4″ thick
MDF for the sides, bottom and top and 1/4″ thick MDF for the back.

When I
got home I marked all of the boards A-E according to the plans (next
time I will mark them as I measure them at Home Depot to save time).

Now, you don’t need a saw but you MUST have a drill…

and
Gorilla Glue Wood Glue. When attaching the boards together spread wood
glue generously between every piece you are attaching ~ the screws will
act as clamps while the glue is drying.


You will
need to predrill holes for all of your screws. Choose a drill bit that
is a tad smaller than the thickness of your screws so that the screws
will only cut the thread. (MDF is soft and this will protect the wood
from splitting.

Because I
could not find the suggested cabinet screws, a Home Depot employee (and
my hubby) suggested these Deck Mate screws. I’m not sure what the
difference is but they worked like a charm!

After
predrilling I inserted the screws. (You will be drilling blind so a line
is helpful to mark where the other board is located).

Looking good! (Ana offers a how-to square and level HERE).

Another step ~ per plans!

The
plans suggest 2 1/2″ base moulding but I could not find any under 3″.
So, I just picked a preprimed trim that I liked at 2 1/2″. It worked
great!

Almost done!

Predrilling the top (note the penciled line).

Adding screws to the top.
Now for
the back side. Ana suggests 1/4″ thick plywood for the backside because
it is cheaper than MDF or hardwood plywood. I opted for 1/4″ MDF
because the cubbies will be open, exposing the back. It was more
expensive but I know I will be more pleased with the look.

I used these 1″ wire nails to hammer the backside on.


Finally,
go back and fill in the holes made by the screws with Elmer’s Wood
Filler (this step is important because your piece will look much nicer
without screws and holes showing).

This step is also easy! Just squeeze a bit of wood filler in each hole…

then, pack and smooth. If the filler is not flush you can sand it down with a light grit sand paper.

and here
we are! Now remember these are just the two bottom bases that go on
either side of the TV stand. The total cost for these together was
$42. It took me 30 mintues at Home Depot and 45 minutes to build each
cabinet. NOT BAD!!! Ana also provides plans to add drawers inside of
these cabinets but I am going to wait until the entire system is built
before I decide if I will add the drawers. Stop by next week as
I try to tackle the media stand that goes between these ginormous
bases. I can’t wait!!!
TO BE CONTINUED….
Step 2
Barn Storage System that I found over at Ana’a Blog ~ Knock Off Wood. Last week I completed the open cubbies. If you missed that tutorial you can check it out HERE. My goal in this series of projects is to prove to you that you CAN do this too! I have very minimal carpentry skills and just like many of you, I have NEVER built a piece of furniture from scratch. Well, now I actually have and I am ADDICTED!

This week I moved on to the media base and you can see the plans I used for it HERE. (It’s the part the TV stands on).

I
started by drawing out a cut layout on a piece of graph paper so that I
could maximize the amount of cuts per sheet of MDF. I then took the
layout to Home Depot where they cut all of the boards for FREE! ( I
know some of you mentioned that your Home Depot would not cut or charged
per cut. I did ask this time and it turns out that my Home Depot cuts
the first two cuts for free and then it is $0.25 for each additional
cut. They were very nice and still did not charge me for any of the
cuts…hopefully I will get this lucky everytime!)

This is a close-up of the cut layout for the 3/4″ MDF, which I used for the top, sides and back of this piece.

Here is a close-up of the cut layout
for the 1/4″ plywood that I used for the back. I had to use plywood
because they did not have a long enough piece of 1/4″ MDF:( I bought
the longest piece available and added a few cuts for the backs of future
pieces to get my money’s worth. The cut needed for this piece is the
top left cut. (Feel free to copy my cut layout and take it with you…I
just handed it to the Home Depot guys and they cut it while I shopped
around.


Make sure to line each edge with Gorilla Glue Wood Glue before you secure them with screws.

Most of
the predrills are blind so I draw a line to guide where I should place
the screws. 3/4″ is not very thick so a bad angle or placement of a
screw could make it tear through the surface. (If this happens, no
worries! You can sand it and fill it with wood filler and sand again.
Good as new!)

Using a
drill bit that is a tad smaller in circumference than the screws you are
using, predrill at least three holes (make sure to start at least 1″
from the edge to protect the wood from splitting…I use three fingers vs.
measuring). I also predrill the first hole and then add the screw
before I predrill the other holes so that the boards stay still.

Here are the screws I have been using.


Drill
the screws in until they are below the surface just a little. You can
fill in the gap later with wood putty for a more finished look.

After the first steps.

and another…

Almost done!


Next, I used 1″ wire nails and hammered the piece of plywood to the back side.


I used Gorilla Glue Wood Glue and wire
nails to attach the top trim and base molding. I then hammered the wire
nails to secure the back piece of plywood.


Finally, a little Elmer’s Wood Filler in each screw hole..

and pack and smooth. If it is not flush you can sand it down with a light grit sand paper.
Done!


This
part of the Storage System was definitely harder than the open cubbies
because of the shelves but it was still easy. Total cost was about $45
and it took me about 2 hours to complete. If I can do it ANYONE can!
Just do one piece at a time. You will be amazed at what you can do when
you set your mind to something. Check back for the next piece to my
Storage System!!!
TO BE CONTINUED….
Step 3
I’m back to share the latest progress on my storage wall. If you have missed the last two tutorials you can visit Part 1 and Part 2. I found the plans for this project on Ana’s blog Knock Off Wood.
Ana provides FREE plans for knock off furniture (i.e. Pottery Barn and
Restoration Hardware) so you can dress your house for less! Go check
out her site!…you’ll be addicted!
So, this is Part 3 of this system and I chose to tackle the cubbies this go ’round (see Ana’s plans
for the cubbies). If you are wondering what Part 4 will be…it’s not
featured in this picture. Ana designed her own plans for a media bridge
to go over the TV, so that will be my final piece to this puzzle.
Believe it or not, I am a little sad to see this project coming to an
end, however I’m sure I will no longer be feeling that way once it’s
time to paint:/

I
started by drawing out plans for the cut layouts. Although I am only
doing the cubbies this time, I went ahead and added the cuts for the
media bridge to maximize the amount of cuts per sheet (those cuts are in
red). This will also make it easier for the guys that cut your boards
at Home Depot. The drawing above shows that I needed three 8′ sheets of
MDF at 3/4″ thick and one 8′ sheet of plywood at 1/4″ thick.

3/4″ MDF

3/4″ MDF

3/4″ MDF

1/4″ plywood
I gave
these layouts to the guys at Home Depot and they cut all of the pieces
in about 30 minutes. Price per cut varies per store. My local Home
Depot offers the first two cuts free and then charges $0.25 per
additional cut. They were wonderful and never charged me for a cut!
Now for the building!!!

Make sure to label each cut. This will save you time and headache while you are building:)

I always
mark off a line to follow when I am predrilling so that the screw will
go through the very center of the board on the other side. MDF is soft
and if you get too close to one side it will raise up or split through
(if this happens, no worries, just sand with 120 grit paper, fill with
wood putty, sand and find another point to predrill).

Mark off
all of your measurements before predrilling. In this picture I am
showing how I marked off where this board is to be placed.

I always
use three fingers to measure how far away from the edge I should start
predrilling. If you get too close to the edge it will split.

ALWAYS
predrill with MDF!!! It is very easy. Pick the right circumference for
your drill bit (just a tad smaller than the screws you will use) and
drill all the way in and pull back out while still pushing on the
trigger.


After predrilling run a generous amount of Gorilla Glue Wood Glue down the edge of the board and put back in place.


Follow up with the screw. I use these Deck Mate screws and they work great.

After the first step.

Second step (added the top).

This is after the third step. It was a little tricky so I’ll show you my steps.

Ana says that wood glue is very important on this step so I added it here too.

I marked
off where I needed to predrill. This is the top shelf that I am
securing and my drill would not fit between the bottom and middle shelf
so I drilled one screw at the front and one at the back at a slight
angle. No problems.

Now for the trim. Add the wood glue.


Secure with nails per Ana’s plans. I set the cubby upside down to hammer the nails in. These nails worked just fine.

Using the same nails, I hammered the back piece into place.
I just couldn’t wait to put it in place!

I have
only finished one of the cubbies but I wanted to share it with you! I
will be back with updated pictures after I finish the other three! I am
still leaning towards adding drawers to the bottom outside bases but I
won’t make the final decision until it’s done. Well, I’m off to finish
the other cubbies!
Step 4

I’m
finished with the cubbies! Yay!! I told you that I would be back with
pics after completing the other three cubbies and here it is!!!

Woohoo!!! The only part that I have left to construct is the Media Hutch….oh and the drawers on the bottom corner bases. If you missed the post on how I used Ana’s plans, from Knock Off Wood, to build the cubbies you can go here.
Total Cost for Materials:
I have
had some question on the total cost I have spent to build this. I have
purchased all of the wood so far (minus the wood for the drawers) and it
has cost $210 exactly. I live in Texas and prices vary by locations so
if you are trying to plan the cost for your own, you can use my cut
layouts to determine how many boards you will need to buy and price them
at your local hardware store. I anticipate spending another $30 for
the drawers but I will give you the exact cost once I complete the
entire piece! Step 5
Almost Done!!!
Part 4 of this project is the Media Hutch. It is not included in this picture but Ana designed her own piece to go over the TV!!! This was definitely one of the easier pieces to this puzzle!

I started by joining the sides to the bottom.

I marked a line to guide where the screws should go.

Predrill your holes by using a drill bit that is a tad thinner than the screws you are using.


Use a generous amount of Gorilla Wood Glue…


and follow up with the screws.

Next I measured for the dividers.

I followed the same steps to attach the dividers. This is after the first one.

Picture after adding the second divider.
Now to secure the top.

Again, make sure you mark off a line where the screws need to go.

Follow the same steps making sure to secure with Gorilla Glue Wood Glue.


Add the trim using Gorilla Glue Wood Glue and small nails. I used three nails and hammered them into the top of the hutch.

I used the same nails to hammer the back of the hutch on. I used 1/4 inch plywood for the back.

Here is
the finished pic. The hutch will actually be at the top over the TV if
you can picture it. I cannot attach it in the right place until I have
it upstairs in the gameroom but I was so excited that I wanted to show
it:)
Here are pictures of the steps!


Part 4 ~ Media Hutch
I am still going to add drawers to the bottom bases next week!
Go visit Ana over at Knock Off Wood
and check out all of the awesome furniture plans so you can dress your
house for less!!! This is my first attempt at building my own furniture
from scratch and if I can do it anyone can!!!
Step 6
Hey guys! I am DONE painting my Cameron Storage System!!!

I got the plans for this system free at Knock Off Wood!
Now for
my paint choice!!! This is going in my playroom/gameroom so I really
wanted to pick a fun and bright color. Green came to mind so off to
Home Depot I went.

I didn’t
want plain green but a bright pea green. I found the color Leapfrog by
Behr and it was exactly what I had pictured in my head…. I had them
add a primer to it for about $9 and I am so glad I did!!! MDF soaks up
paint like a sponge and I still only had to use 2 coats! It took the
entire gallon of paint!

I was
going to paint it on with a paint roller but I was guided towards this
paint brush as a better alternative by a nice man at Home Depot. He
didn’t work at Home Depot but he had a Dupont Paint jacket on so I
assumed he was legit! It took many grueling hours of painting but the
finish turned out awesome. This brush is angled so it made edges and
corners so easy!

Here is
the system dismantled and painted. I will admit I was very worried that
I picked the wrong color after opening the paint lid but I LOVE LOVE
LOVE this color now!!! I’m so glad I stepped out of my safe zone and
went with a bold color:)

I can’t just leave it alone…gotta distress it!!!

I used my 3M sanding block on all of the edges.


Next, I
used a foam brush to wipe Minwax stain over the distressed area and then
wiped off the excess. As far as the color stain I picked, I just used
the Red Mahogoney that I already had. If I were to have gone out and
bought some for this project I would have picked Dark Walnut. This was
free and there was not a big area being stained so it didn’t make much
of a difference to me.


Such an easy technique and it makes such a huge difference! 1 down 8 to go!!! I’ll be back soon with a tutorial on the drawers!!!
Step 7
The building and painting is done!!!! I finished the drawers this weekend and they were super easy!

I got the plans for the drawers and the rest of this system over at Ana’s site, Knock Off Wood. If you like name brand furniture without the ridiculous price tag head on over to her site! She offers plans for free!!!

She does
offer a cut layout for 1 drawer but I had to do 2 and I didn’t have
enough scrap wood left over. So, here is a cut layout for 2 full
drawers using 3/4″ MDF.

After first step.

All of the sides complete. This is just a very simple box!

Adding the face… I am using Ana’s technique in this pic..worked great!

Gorilla Glue Wood Glue is a must for this entire project!

I poured a ton of Gorilla Glue Wood Glue all over the front of the drawer before attaching the face.

Using
Ana’s technique, I layed the face over the front of the drawer and made
sure that there was equal space around the perimeter.
***
Ana suggests nailing the face onto the drawer but I did not want to
deal with covering the nail heads. Gorilla Glue Wood Glue is strong
enough that no nails are needed. After the drawers were dry, I carried
them upstairs by the faces and they didn’t budge!!! *****

I
painted the drawer faces with Behr Leapfrog (satin) and distressed the
edges. I then followed up with Minwax Red Mahogany Stain and wiped off
the excess.

***Ana
also suggests using 18″ undermount drawer slides but I just placed the
drawers in the bases without them. I did not want to fuss with getting
them lined up. I’m sure it would be nice to have them but I have no
complaints:)***
Now for the hardware!!!

Because
the face of the drawer is attached to the front of the drawer I needed a
cabinet screw long enough to reach through 1.5″ of MDF. The screws
that come with the knobs are not long enough so I used this “thingy” to
solve my problem!


It carved out layers of the MDF so that a standard screw would fit! And it makes such a clean hole!

I found these cute knobs at Lowe’s!


Screwed them in and that was it!
I’m
so excited to have this done and in my gameroom! I still have several
ideas up my sleeve for this piece that I can’t wait to get started on
and of course share with you all!
Step 8
It’s DONE!!! I don’t know if I am more happy that my work is done or that I am finally enjoying it!

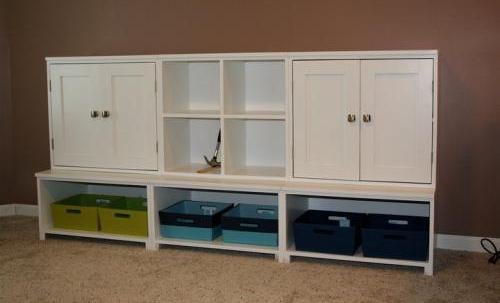
No this one is not mine! This one is actually around $3,000 when you factor in shipping and decor!

This is mine! Total cost for this piece is $300 including decor!
How did I
do it? Well, let me first start off by saying that I am NOT a
carpenter and I have never built a piece of furniture from scratch! I
learned as I went with this piece thanks to Ana over at Knock Off Wood! She
has a ton of plans offered on her site, free of charge, so that people
like us (practicle DIYers that drool over name brand furniture in the
catalogs but would never spend a penny on the over-priced manufactured
wood) can build them ourselves to enjoy in our homes! This was a huge
undertaking for me but I accomplished it from beginning to end all with
my own two hands!!!! If I can do this, so can you! I challenge all of
you to check out Ana’s site and pick a project! She has so many to choose from and you can start out with something as small as an end table or a chair!
The last two weeks, I have focused on decorating and personalizing my storage wall!

I
started out by purchasing these super cute Closet Maid fabric drawers at
Target! They were on sale last week at 2 for $10! I bought 8 navy, 4
chocolate and 4 dark khaki. Total for 16 was around $90.
How I personalized!

This is set-up just like the one in the picture. Ana designed her own plans to add a hutch over the TV so of course I couldn’t leave that piece out!

Here she is with the hutch!
I just couldn’t leave well enough alone! I had to personalize it just a tad more so…

I
purchased this foam crown moulding at Lowe’s! The corner pieces allow
for no miter installation. I purchased a 12′ piece of crown for $34 and
the corner pieces for $6 each. This foam stuff is soooo cool! Our
grandfather actually installed it in his home and you would NOT even
know it is foam! It has some type of primer on the front so it paints
very well! It is also very dense and feels durable! Best part is that
it is sooo much cheaper than wood moulding. I would have spent twice as
much on wood crown that is identical to this stuff!

This stuff is so light weight that I just used several finishing nails to hold it up!

It really makes a statement in the room now!
My
favorite part about this system is the storage!!! I am so OCD (no joke)
so the storage this wall offers really makes my heart skip!!! Yes, I
am a nerd! My fellow OCDers, these pics are for you! Everyone else
please bear with me:)


Everything organized and in it’s place and the best part about it is….

it’s HIDDEN!

I owe a big thank you to Ana!
I would not have this beautiful, fully functional piece of furniture
that I built with my own 2 hands if she had not created the plans to
begin with! I have always drooled over this piece in the catalogs and
online but I knew that I would never purchase it from the retailer.
Even if I could afford it, I could not justify the price tag! I spent
10% building it myself and I was able to personalize it with Leapfrog by
Behr and moulding! Thanks so much Ana! I can’t wait to move on to my next project!
If you
would like the step by steps that I took to build this piece, here are
the links in the order I went! There are links to Ana’s plans in each post as well!
If you
take it one step at a time it is VERY managable! I did one part per
week and only needed wood glue and a drill! The building part was the
most fun! Painting was my least favorite ~ it took an entire gallon of
paint but the fruits of my labor make it all worth it!!! The family
loves it and I get such joy looking at it knowing that I actually made
it!!! Thanks so much for following me on this journey!!
http://www.shanty-2-chic.com/2010/03/
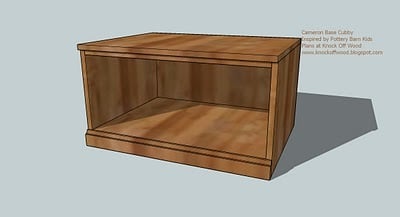
Open Bases for the Cubby Storage Collection
Part of the Cubby Storage Collection, this open
base is part storage, part bench, and a whole lot of cuteness! Works
with the drawer plan or the cubby hutches. Also available is a media
console to create a media storage wall. See all plans in the Cubby Storage Collection.
Handmade from this plan >>
Projects built from this plan. Thank you for submitting brag posts, it's appreciated by all!
No brag posts have been found yet. Have you built this project? Please help other by submitting brag posts.
Dimensions
Dimensions:
Dimensions:
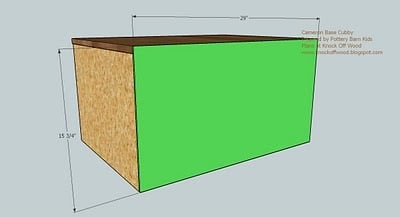
15 3/4" High x 29" Wide x 23" Deep Materials and Tools
Shopping List:
1 sheet of Hardwood Plywood or MDF (see here for a post on choosing your wood types)
30″ of 2 1/4″ base moulding (shown below)
1 – 1×2
29 x 15 3/4″ piece of 1/4″ plywood (you can use 1/2″ or 3/4″ scrap from the sides)
2″ Nails
1 1/4″ Nails
Wood Glue
Wood Filler
Sand Paper
Paint, Varnish, Primer, Brushes and other finishing supplies
Edge Banding
You will need moulding for the footer of this cubby.
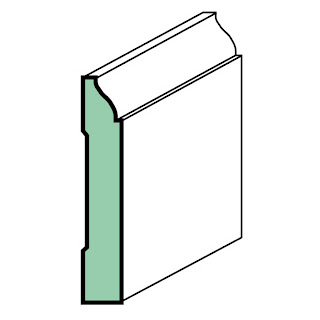
Lowes sells it here. At our local Home Depot, you can actually cut exactly how much you need, instead of having to buy a 8′ stick. This type of moulding is generally inexpensive.
Lowes sells it here. At our local Home Depot, you can actually cut exactly how much you need, instead of having to buy a 8′ stick. This type of moulding is generally inexpensive.
2 inch screws
1 1/4 inch finish nails
1 1/4 inch pocket hole screws
wood glue
wood filler
120 grit sandpaper
primer
paint
Tools:
measuring tape
square
safety glasses
hearing protection
circular saw
jigsaw
table saw
nailer
sander
Cut List
Cut List:
A) 2 – 3/4″ Plywood or MDF @ 15″ x 21″ (Sides)
B) 1 – 3/4″ Plywood or MDF @ 27 1/2″ x 21″ (Bottom Shelf)
C) 1 – 1×2 @ 27 1/2″ (Top Inside Trim)
D) 1 – 3/4″ Plywood or MDF @ 21 1/2″ x 29″ (Top)
E) 1 – 1/4″ Plywood @ 29″ x 15 3/4″ (Back)
F) 1 – 2 1/2″ Base Moulding @ 29″ (Base Trim) (See above picture and link)
General Instructions
Cut all your boards. Make sure you cut straight
boards, especially your plywood. Be aware of your saw blade clearance
when marking out your cuts. Use a square or see the HOW-TO section for a
video on checking for square. Always use glue and 2″ nails unless
otherwise directed. IF YOU ARE USING MDF, YOU MUST USE SPECIAL CABINET
SCREWS. Measure and mark your board before fastening.
Step 1

Cut the pieces from plywood. Be aware that your
sawblade takes up space when you make your cuts, so you can't just mark
and cut. Rather you need to mark each board, cut, mark, cut and so on.
It is very important that you make good straight cuts.
Step 2
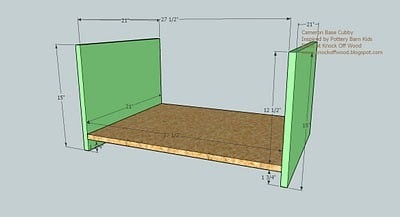
Build the box. Fasten the sides, A (green) to
the bottom, as shown above, leaving 1 3/4″ clearance under the bottom
shelf, B. Make sure you fasten this piece level and square with the
sides.
Step 3

Build the box. Fasten the sides, A (green) to
the bottom, as shown above, leaving 1 3/4″ clearance under the bottom
shelf, B. Make sure you fasten this piece level and square with the
sides.
Step 4
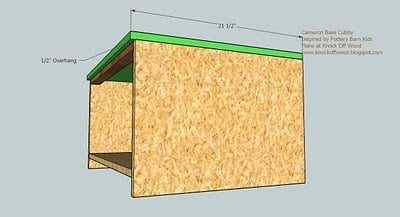
Fasten the top. Keeping the back and side edges
flush, fasten the top, D (green) to the sides, A, using 2″ nails. Use
the 1 1/4″ nails to nail the top to the top trim piece.
Step 5
Add the Back. Nail the back in place as shown
above. Make sure you square the piece first, and use glue and nail into
the bottom.
Step 6

Fasten the Moulding. Nail the base moulding in place as shown above.
Finishing Instructions
Preparation Instructions:
Fill nail holes with putty and sand. If you built
the piece out of 3/4″ plywood, iron the edge banding to the exposed
edges of the plywood. If you are using MDF, paint as desired. Add your
sealer, if desired.
Nessun commento:
Posta un commento