
Chi pensava che le tanto amate borchie finissero nel dimenticatoio con la fine dell'anno vecchio, dovrà ricredersi. Passerelle, mercatini e atelier vari sono ancora pieni, stracolmi di abiti, scarpe, accessori decorati con le indiscutibili icone della moda punk anni '70, che svestiti i panni delle “bad girls” adesso fanno bella mostra di sé sui catwalk dell'alta moda e sembrano godere di ottima salute. Che siano applicate su un giacchetto di pelle, su una ballerina, su una borsa o su una camicia bon ton poco importa. L'importante e che ci siano e che siano tante.
L'utilizzo della borchia, come già accennato, risale agli anni '70 con l'avvio della cultura punk, che nasce sull'East Coast statunitense. Sarà però Londra che darà al genere punk la sua massima espressione, anche in termini di cultura e abbigliamento. Punk significa di scarsa qualità, da due soldi. Ed è così che la borchia veniva veniva utilizzata all'inizio: rendeva aggressivo il look semplice e sdrucito che indossavano i primi seguaci di questa cultura. Furono riprese negli anni '80, diventando l'accessorio rock per eccellenza, mentre negli anni '90 vennero utilizzate massicciamente dai dark. È però in questi ultimi anni che abbiamo assistito allo sdoganamento vero e proprio della borchia, che viene inserita anche negli abiti più eleganti o d'alta moda. Sono innumerevoli gli stilisti che l'hanno utilizzata per arricchire i propri capi, rendendola un must dei nostri giorni. Pioniere delle studded shoes d'alta moda è sicuramente Christian Louboutin: i suoi ankle boot e le decolltè sono un'icona fashion. Anche le comunissime e sempreverdi All Star sono state ricoperte di borchie, che le rendono ancora più grintose.
A questo proposito, vi do un'idea low cost su come utilizzare le borchie. Le più creative o quelle che vogliono salvare qualche euro nel portafoglio, potranno trovare online tantissimi negozi che vendono inserti metallici di tutte le forme e colori. Con uno dei tanti tutorial che si trovano su youtube, potrete realizzare i vostri personalissimi capi borchiati low cost. Basta acquistare una maglietta anonima o un paio di ballerine al mercatino sotto casa, oppure tirare fuori dall'armadio quel vecchio paio di jeans (http://www.missatlaplaya.com/2009/04/diy-studded-jeans-more/) o quella borsa che ci ha stancate e che non mettiamo più (http://www.leblogdesushi.com/2009/07/diy-alexander-wang-inspired-studded-bag.html) e il gioco è fatto. Quindi via libera alla fantasia, senza preoccuparsi di spendere cifre astronomiche. E per quelle che amano osare ci sono perfino le studded nails. Qui spiegato come farle (http://www.youtube.com/watch?v=kP_7O0KnB8I).
Malcom McLaren, creatore e leader dei Sex Pistols, sarebbe senz'altro fiero di noi.
Perchè in borchia we trust!
http://www.leidonnaweb.it/moda/tendenze/item/340-in-borchia-we-trust.html
DIY: Studded jeans & more
I remember that some seasons ago I used to wonder why Burberry was using so many studs on the clothes. Since when were they punk?
And then Balmain appeared with all the studs on the jackets and shoes and suddenly they were everywhere. Now I don’t wonder, I just love them.
So far I’ve made these jeans with studs on the left pocket. Then I think I’ll make my own Balmain jacket. Sounds like a plan.
So far I’ve made these jeans with studs on the left pocket. Then I think I’ll make my own Balmain jacket. Sounds like a plan.
————————-
Hace varias temporadas me preguntaba: ¿Por qué en Burberry le ponen tachuelas y pinchos a todo? ¿Desde cuándo se han vuelto punks?
Y entonces llegó Balmain con las tachuelas en las
chaquetas y los tacones, y empezaron a estar por todos lados. Ahora ya
no me pregunto nada, es que simplemente me encantan.
De momento me he hecho mis propios vaqueros con el bolsillo despegado y lleno de tachuelas. Luego creo que vendrá la chaqueta Balmain. Y luego… ya veremos….
De momento me he hecho mis propios vaqueros con el bolsillo despegado y lleno de tachuelas. Luego creo que vendrá la chaqueta Balmain. Y luego… ya veremos….
What do you need:
- Studs (available at Studs & Spikes. I recommend this size, and you will need 100 studs aprox.) / tachuelas (a la venta en Madrid en Pontejos y en Studs & Spikes, por internet. Recomiendo este tamaño, necesitaréis unas 100)- Jeans / unos vaqueros
- A glass (optional) / un vaso (opcional)
- Studs (available at Studs & Spikes. I recommend this size, and you will need 100 studs aprox.) / tachuelas (a la venta en Madrid en Pontejos y en Studs & Spikes, por internet. Recomiendo este tamaño, necesitaréis unas 100)- Jeans / unos vaqueros
- A glass (optional) / un vaso (opcional)

Steps:
1. Cut the left side of the pocket, leaving the seam intact. /// Corta el lado izquiero del bolsillo dejando la costura.
2. Place the glass under the denim, to tighten the fabric, it will be easier to add the studs: /// Pon un vaso debajo de la tela para que la tela quede tensa y puedas pinchar las tachuelas fácilmente

3. Hold the fabric while you insert the studs /// Sujeta bien la tela mientras vas colocando las tachuelas

4. Seal every new stud you add. I suggest you used the same hole for the next stud so they won’t fall apart (see the picture above) /// Ve cerrando cada nueva tachuela que pongas, porque si no se salen solas. Recomiendo que uséis el mismo agujero de la última tachuela que habéis colocado (mirad la foto de arriba)

5. Continue adding the studs until the pocket is fully covered /// Sigue colocando todas las tachuelas con cuidado para que quede todo recto hasta que el bolsillo esté completamente cubierto

More ideas:

credit
They sell many different types of studs, and I think these look cute /// Hay bastantes tipos de tachuelas, éstas redondeadas me parecen monas.

nast magazineThis might be more difficult to find, but isn’t it beautiful? /// Puede que este tipo de “tachuelas” sean más difíciles de encontrar, pero el resultado es una preciosidad.

It looks more like tiny mirrors than studs, but it can be used as inspiration /// Parecen más bien espejitos que tachuelas metálicas, pero como idea no está mal.

Amazing, huh? It looks so elegant, and very easy to do /// Genial, ¿no creéis? Me parece súper elegante, y además facilísimo de hacer

A cute detail /// Un detalle mono
DIY: Studded jeans & more

I remember that some seasons ago I used to wonder why Burberry was using so many studs on the clothes. Since when were they punk?
And then Balmain appeared with all the studs on the jackets and shoes and suddenly they were everywhere. Now I don’t wonder, I just love them.
So far I’ve made these jeans with studs on the left pocket. Then I think I’ll make my own Balmain jacket. Sounds like a plan.
So far I’ve made these jeans with studs on the left pocket. Then I think I’ll make my own Balmain jacket. Sounds like a plan.
————————-
Hace varias temporadas me preguntaba: ¿Por qué en Burberry le ponen tachuelas y pinchos a todo? ¿Desde cuándo se han vuelto punks?
Y entonces llegó Balmain con las tachuelas en las
chaquetas y los tacones, y empezaron a estar por todos lados. Ahora ya
no me pregunto nada, es que simplemente me encantan.
De momento me he hecho mis propios vaqueros con el bolsillo despegado y lleno de tachuelas. Luego creo que vendrá la chaqueta Balmain. Y luego… ya veremos….
De momento me he hecho mis propios vaqueros con el bolsillo despegado y lleno de tachuelas. Luego creo que vendrá la chaqueta Balmain. Y luego… ya veremos….
What do you need:
- Studs (available at Studs & Spikes. I recommend this size, and you will need 100 studs aprox.) / tachuelas (a la venta en Madrid en Pontejos y en Studs & Spikes, por internet. Recomiendo este tamaño, necesitaréis unas 100)- Jeans / unos vaqueros
- A glass (optional) / un vaso (opcional)
Steps:
1. Cut the left side of the pocket, leaving the seam intact. /// Corta el lado izquiero del bolsillo dejando la costura.
2. Place the glass under the denim, to tighten the fabric, it will be easier to add the studs: /// Pon un vaso debajo de la tela para que la tela quede tensa y puedas pinchar las tachuelas fácilmente
3. Hold the fabric while you insert the studs /// Sujeta bien la tela mientras vas colocando las tachuelas
4. Seal every new stud you add. I suggest you used the same hole for the next stud so they won’t fall apart (see the picture above) /// Ve cerrando cada nueva tachuela que pongas, porque si no se salen solas. Recomiendo que uséis el mismo agujero de la última tachuela que habéis colocado (mirad la foto de arriba)
5. Continue adding the studs until the pocket is fully covered /// Sigue colocando todas las tachuelas con cuidado para que quede todo recto hasta que el bolsillo esté completamente cubierto
More ideas:
They sell many different types of studs, and I think these look cute /// Hay bastantes tipos de tachuelas, éstas redondeadas me parecen monas.
This might be more difficult to find, but isn’t it beautiful? /// Puede que este tipo de “tachuelas” sean más difíciles de encontrar, pero el resultado es una preciosidad.
It looks more like tiny mirrors than studs, but it can be used as inspiration /// Parecen más bien espejitos que tachuelas metálicas, pero como idea no está mal.
Amazing, huh? It looks so elegant, and very easy to do /// Genial, ¿no creéis? Me parece súper elegante, y además facilísimo de hacer
A cute detail /// Un detalle mono
http://www.missatlaplaya.com/2009/04/diy-studded-jeans-more/
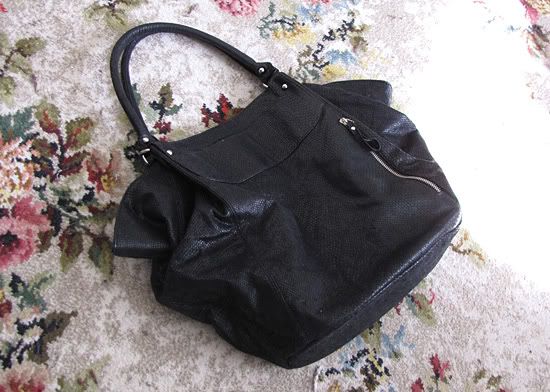
{ DIY Alexander Wang inspired studded bag }

Image courtesy of barneys.com
Alexander Wang 'Coco' duffel bag | USD $850.00
For this DIY I used the Dotti 'Snake Day' bag (which bares an uncanny resemblance to the Wang 'Trudy' tote) and silver cone studs purchased from studsandspikes.com. I'd recommend using a bag with a constructed base so the bottom won't fold up when being worn.
The bag I an using is lined and has a constructed, hard base, which needs to be removed before I can stud the bag. If your bag has a softer base or no lining you'll find it much easier!
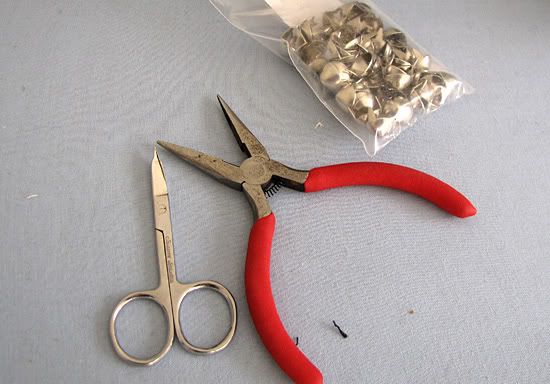
Tools needed include small scissors, pliers, needle & thread, cone studs and a sewing machine.
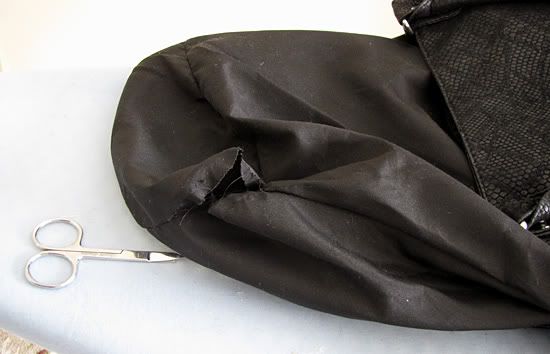
Pull the lining outside of the bag and unpicked the stitching 1/2 of the way around the base, leaving a big enough hole to comfortably work on the bottom of the bag.
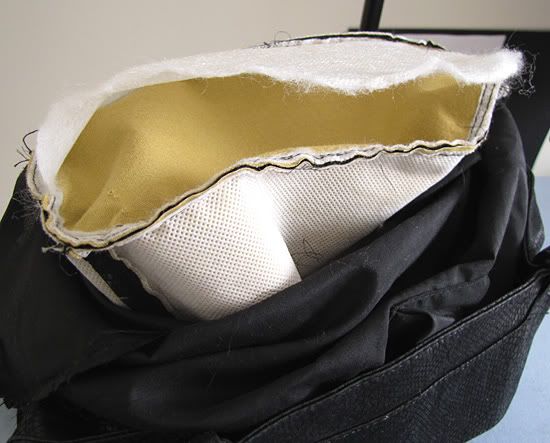
Turn the bag inside out and pull the base through the hole in the lining. Snip the inner most layer of the base 1/2 way around and remove the piece of cardboard base.
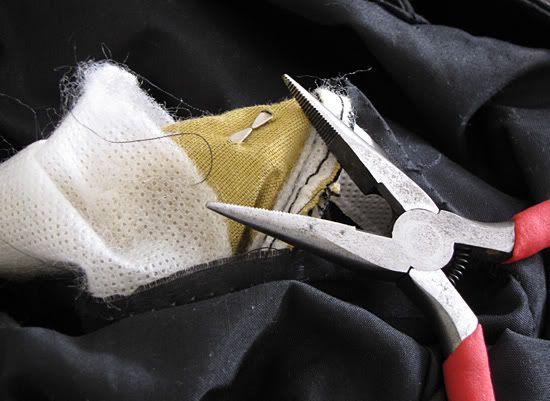
Begin studding the bottom by pushing the stud through the right side of the bag, turning the bag inside out and folding the prongs of the stud over with the pliers.
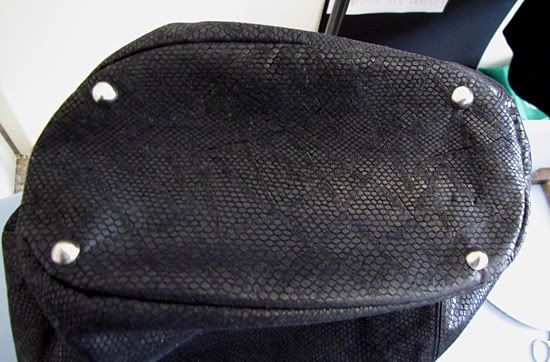
Place a stud in each corner of the bag first, as this will make it easier to align and distance the studs.
Finish the two shorter sides of the bag, then center one stud in the middle of each longer side.

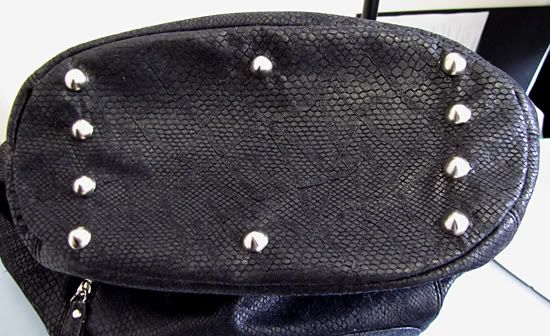
Fill in all the rows (may take a while!). I added two more studs on each end of the base as the bottom of my bag is oblong-shaped.
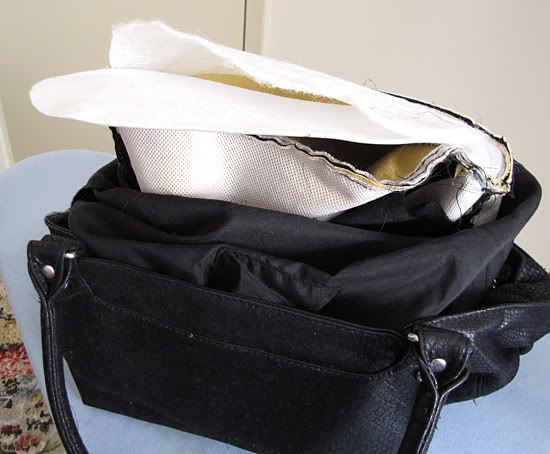
Turn the bag inside out again and re-insert the cardboard base.
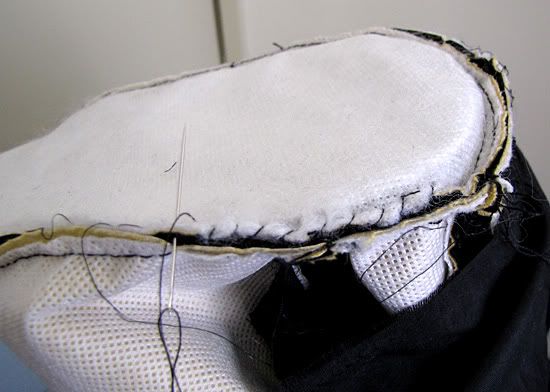
Use a needle and thread to sew up the layers you previously cut through.
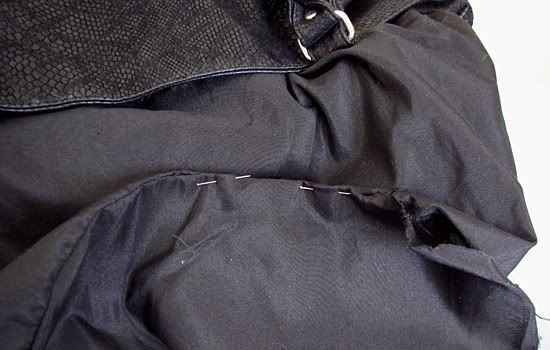
Turn the bag right way out and pull out the lining. Fold the rough edges into the hole and pin the two sides together.
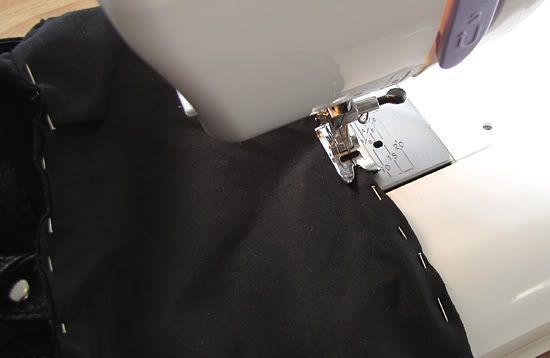
Use a sewing machine and matching thread to closely hem the edge of the lining.
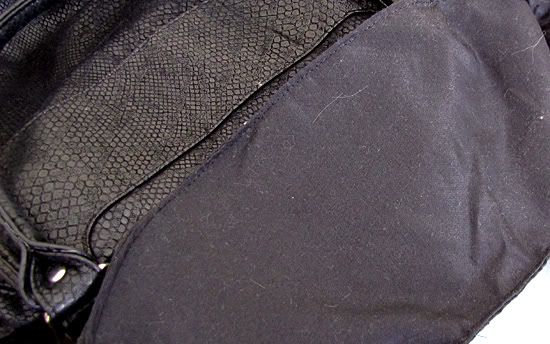
The finished lining should look quite neat. Push it back into the bag.

And you're done! An Alexander Wang inspired bag is all yours!
http://www.leblogdesushi.com/2009/07/diy-alexander-wang-inspired-studded-bag.html
Nessun commento:
Posta un commento